Let’s say you’re using the Mux Video API and have created an asset—a piece of media that is stored or streamed through the Mux system. You’ve been working on some media and are excited to share it with the world! But, you have to upload it first.
A common interface for uploading media is via an upload button (a.k.a. a file picker). This post will help you build the foundation of this end-to-end video upload process. ✨
What we're building
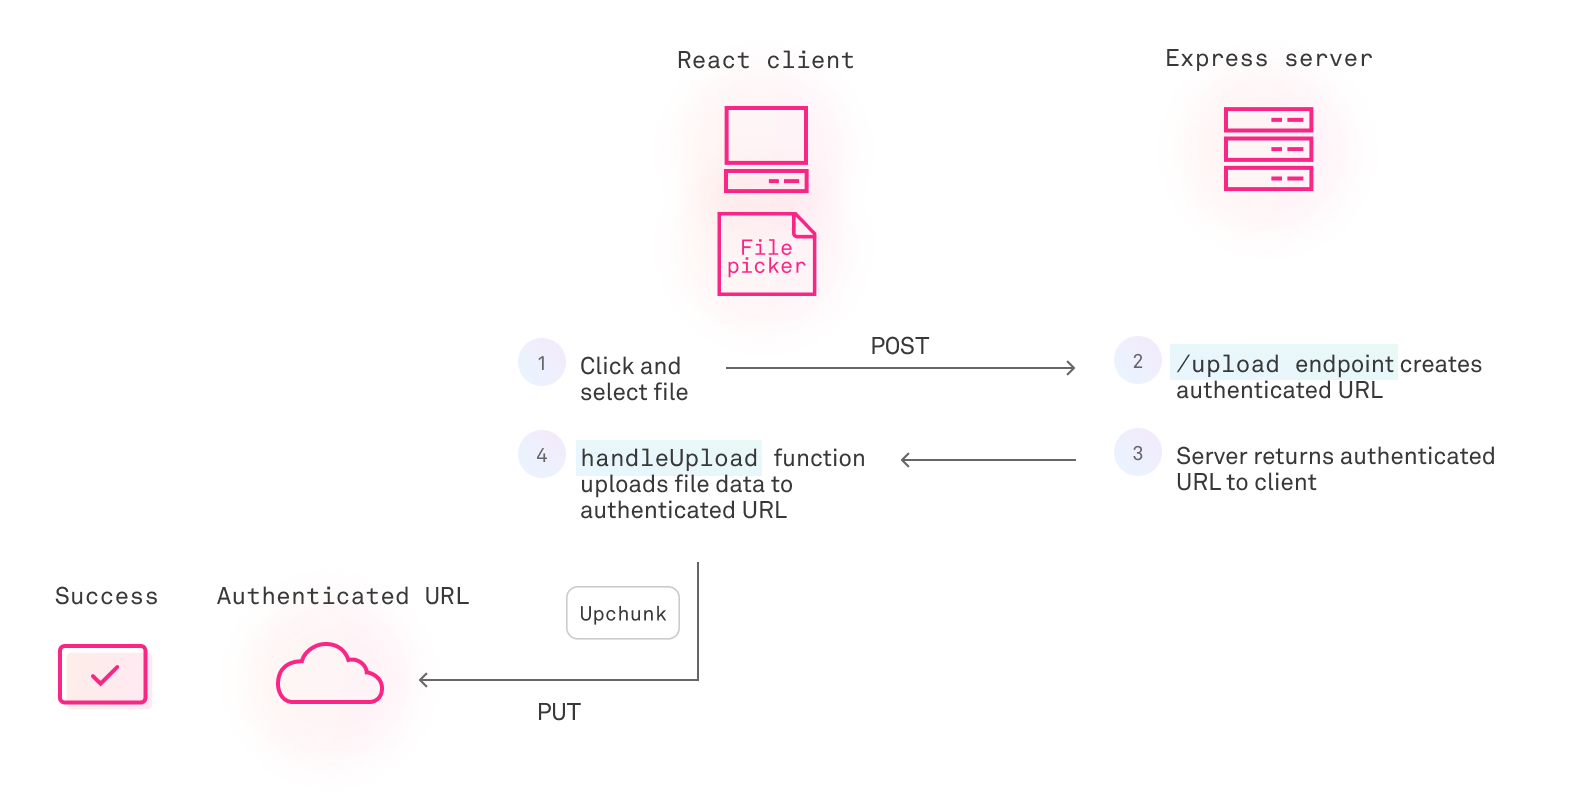
To implement end-to-end direct upload via an upload button, you need both a client and a server. Because you’ll need to make authenticated requests, you need a server to load in confidential environment variables from a .env file. The client is where you’ll build an interface—a file picker—so you can easily select a file for upload.
You’ll get the most from this content if you’re familiar with setting up a basic API in Express, using Node with a server, and writing event handlers client-side in React.
These are the steps we’ll go through:
- Set up starter project
- Create REST API endpoints
- Add logic to handle upload on minimal React upload button
- Upload a video
- Verify video upload via polling
- Verify video upload via Mux Dashboard
Set up starter project
To begin, let’s clone this open-source starter repo for direct uploads with Mux.
Surprise! 🎉 The required dependencies are already in the package.json for you! At the root of the project, where server.js is, run npm install to install server-side dependencies. In another terminal, navigate into the client folder and run npm install for client-side dependencies.
You’ll use axios to make HTTP requests, express to build your REST API, and dotenv to load environment variables from .env files, where you’ll abstract authentication information.
To do all of these things, you’re going to need your Mux API keys for a .env file at the root of your project where the server is. The server needs these keys to make API calls to Mux. If you don’t have them, follow the step below to create a new API token. If you already have your keys, move on to the next step and fill in your .env file with your preferred port, username, and key.
To create a new token, go to your Mux account and click Settings in the left-hand menu. Then select API Access Tokens.
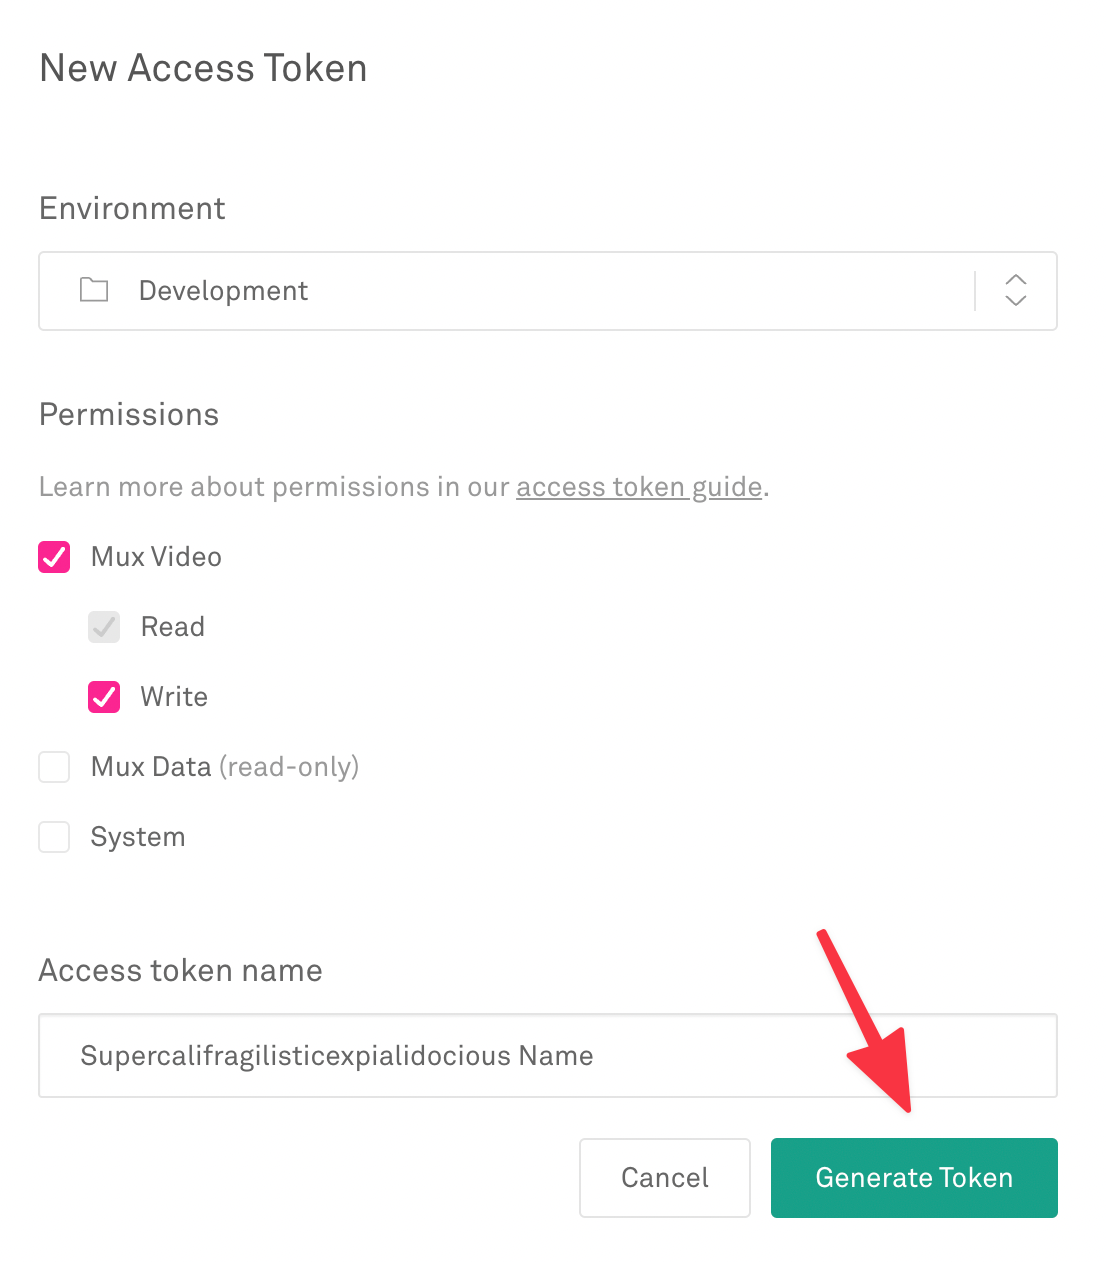
From here, you’ll see a button called “Generate new token” on the right. Click that, and you’ll see a full-width modal. If you are just testing direct uploads with Mux, select “Development” as your environment. You’ll need both read and write access to retrieve information about uploads and assets as well as create new authenticated URLs for uploading your videos.
Under Permissions and subsequently Mux Video, make sure the read and write permissions are checked. Next, give your token a ✨ super cool ✨ name and click “Generate Token!”
Now you have all the power in the universe! Just kidding. Only powers in the Mux universe. Please do be careful with this token. It can be used to take many actions on your Mux account, including deleting your assets or incurring costs to your account through uploading assets or through live streaming. Don't share it with anyone and don't commit it to source control.
If you are familiar with .env files, you can download your new API token information as a .env file from the resulting confirmation screen and move it into the root of the project as long as you use the key names in the following step. If you’re not familiar, keep reading. 📖
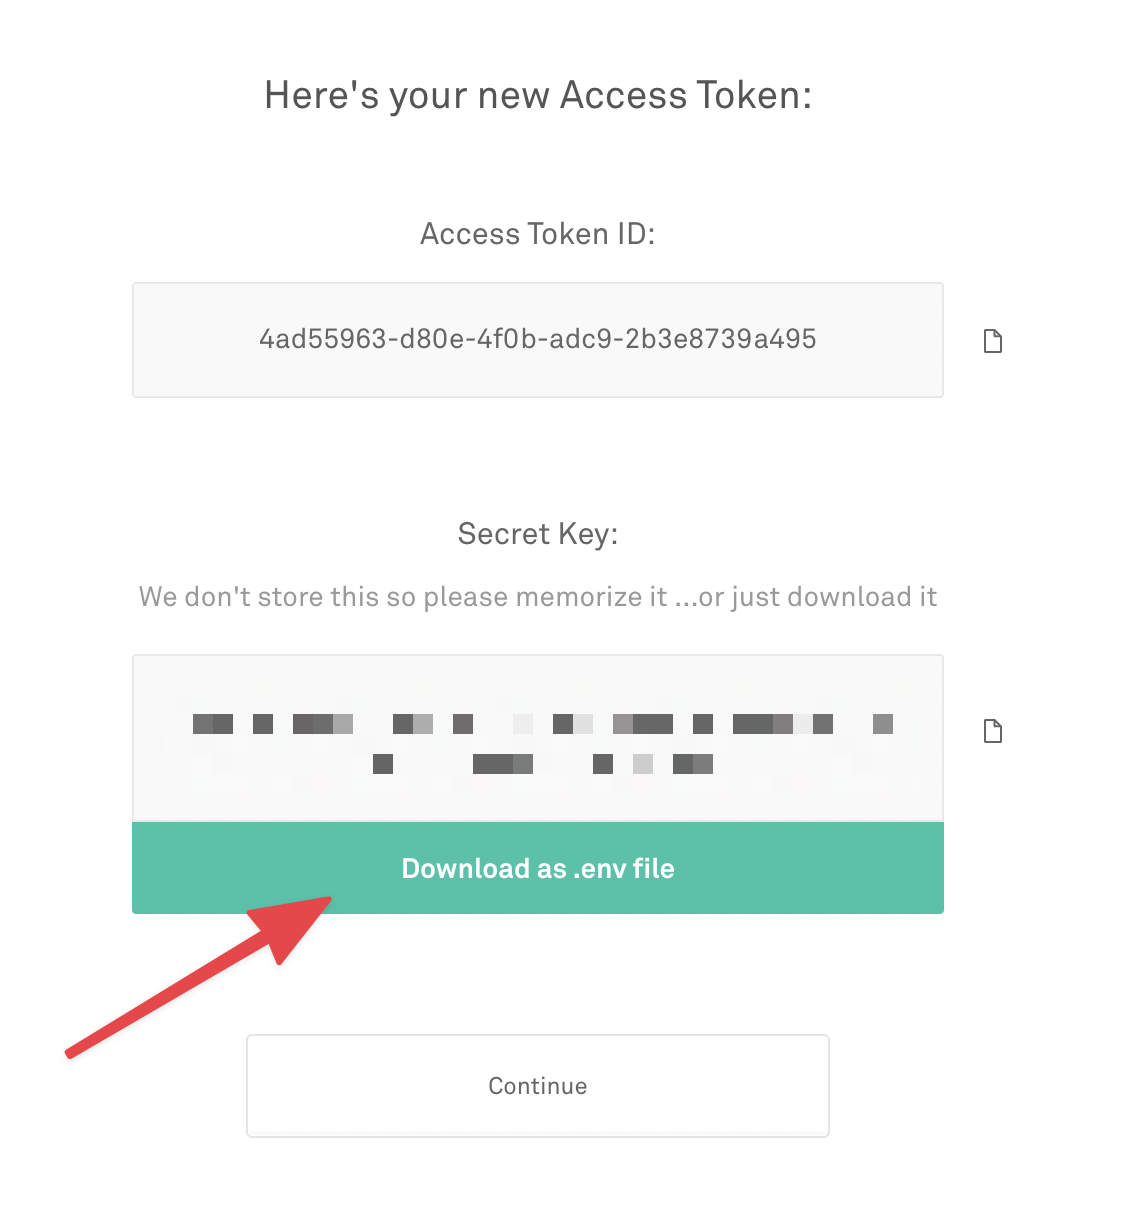
At this point, you’ll see a confirmation screen with your Access Token ID.
Don’t navigate away until you’ve copied the info down. Make sure to store it in a safe place. It’s top secret, after all! 🚨
Create and fill in .env file with Mux credentials
Create a file named .env at the root of the project.
Copy the following code sample and paste the relevant information from your Mux account API access tokens in place of the square brackets and related text.
PORT=[your preferred port]
MUX_ACCESS_TOKEN_ID=[your mux access token id]
MUX_SECRET_KEY=[your mux secret key]
For the port, use something other than 3000, because React will run on 3000 unless you change it.
To get started running the project, open 2 terminal windows.
Run the front-end client with npm run client in one window, and then run the Express back-end server in the other window with node server.js. Open the server.js file in your editor, and let’s get to work. 💪🏻
Create REST API endpoint
Below the options variable in server.js and above app.listen, add your endpoint.
POST (Upload)
app.post('/upload', async (req, res) => {
  try {
    const response = await axios.post(`${baseUrl}/video/v1/uploads`, {
      "cors_origin": "*",
      "new_asset_settings": {
      "playback_policy": [
        "public"
      ],
    } }, options)
    return res.send(response.data && response.data.data);
  } catch (errorRes) {
    return Promise.reject(
      (errorRes.response && errorRes.response.data.error) || errorRes
    );
  }
})
When this endpoint is hit, Mux will create an authenticated URL where you can later upload your video.
There are a couple extra things I want to call out:
- For the second parameter of an axios post request, you are able to pass in an object with parameters to configure your new Mux video asset. For example, the cors_origin parameter with a “*” value will allow requests from any origin to hit your post REST API endpoint. If you want, you can specify your localhost URL.
- new_asset_settings allows you to configure your new asset with certain parameters upon creation. For example, by passing playback_policy and setting it to public, you will be able to create your video asset with a playback ID. You can use that later to play back the video you have uploaded. But that’s for another time. 😉
Add logic to handle upload on minimal React upload button
At this point, you have your server endpoint ready. 🎉
Now, you’ll write a function that will make a POST request to the /upload endpoint when you select a video with the file upload button, which will start the upload process with Mux Video.
Open Button.js and replace the input element within the return with the following:
<input onChange={(e) => handleUpload(e.target)} type="file"
              id="file-upload" name="file-upload"/ >
Now, when the input changes (a file has been selected), a function called handleUpload will fire with an event target (reference to the input element) as a parameter.
At this point, you’ll get an error because handleUpload doesn’t exist. To fix that, write the handleUpload function to handle your POST request inside the Button, above the return.
Now, outside and above your React Button component, add this upload handler:
async function handleUpload(inputRef) {
  try {
    const response = await axios.post('http://localhost:3001/upload');

    console.log('👉 Authenticated upload url:', response.data.url);

    const upload = UpChunk.createUpload({
      endpoint: response.data.url,
      file: inputRef.files[0], // the file object with all your video file’s data
      chunkSize: 5120, // Uploads the file in ~5mb chunks
    });

      // Subscribe to events
    upload.on('error', error => {
      console.error('💥 🙀', error.detail);
    });

    upload.on('progress', progress => {
      console.log(`So far we've uploaded ${progress.detail}% of this file.`);
    });

    upload.on('success', () => {
      console.log("Wrap it up, we're done here. 👋");
    });

  } catch (error) {
    console.log(`😱 Creating authenticated upload url failed: ${error}`);
  }
}
Whoa! I thought we were just making a POST request here! What’s all this Upchunk stuff?
Let’s walk through it top to bottom. Hang on—it’s lengthy, but it’s useful to know! 🎢
First, as mentioned above, when a file is selected with the upload button, you’re making a POST request. Your server will return the authenticated URL created by Mux, and this URL will be captured in the response variable. You can view it with the handy log we’ve set up. 😎
Next, you’re creating an instance of Upchunk. But wait, what is Upchunk?
Upchunk is a package that will handle upload requests for you once you have an authenticated URL to upload to (this is the URL you get from the response of your /upload endpoint). Features include uploading your video in chunks, reporting on the progress of this upload, and allowing you to pause uploads as well as resume them if they get interrupted.
Here, you’re creating an instance of Upchunk with 3 optional parameters:
The first parameter is the endpoint you want to upload to. response.data.url refers to the authenticated URL sent back from your express server from your /upload POST endpoint.
The second parameter is all of your video file’s data, which is accessible via the File web API. If you were to have multiple files uploading at the same time, .files on your DOM element would be an array with length greater than 1. Since you’re only uploading 1 file, you only need inputRef.files[0].
The third parameter specifies the chunk size in kilobytes (KB) that your file should be uploaded in. Breaking up your file upload into chunks makes it easier to recover from upload interruptions.
The rest of the handleUpload function is a bunch of event subscriptions specifying what you should do when the upload either errors, progresses, or succeeds. For the purposes of learning about direct uploads through this walkthrough, we’re limiting these events to logs. 😬
Upload a video
Now that the stage has been set, let’s get this direct upload show on the road! 🤺
Click your file upload button and select a file. Make sure it’s a video!
There are 2 routes you can choose from to verify your upload: polling, or checking in the Mux Dashboard. Choose your own adventure below. 🦁
Option 1: Verify video upload via polling
Polling is when you make an API request to determine if there’s new data.
Make a GET request to https://api.mux.com/video/v1/uploads with your authentication details via Postman/Insomnia or CURL in the terminal. If your upload was a success, you will see a new upload listed in the response of this request with a status of ready along with the configuration you set up earlier, i.e. cors_origin, etc. ✅
Note: While polling is definitely an option to verify the creation of your upload or asset, we do recommend against this in production because of current rate limits.
Option 2: Verify video upload via Mux Dashboard
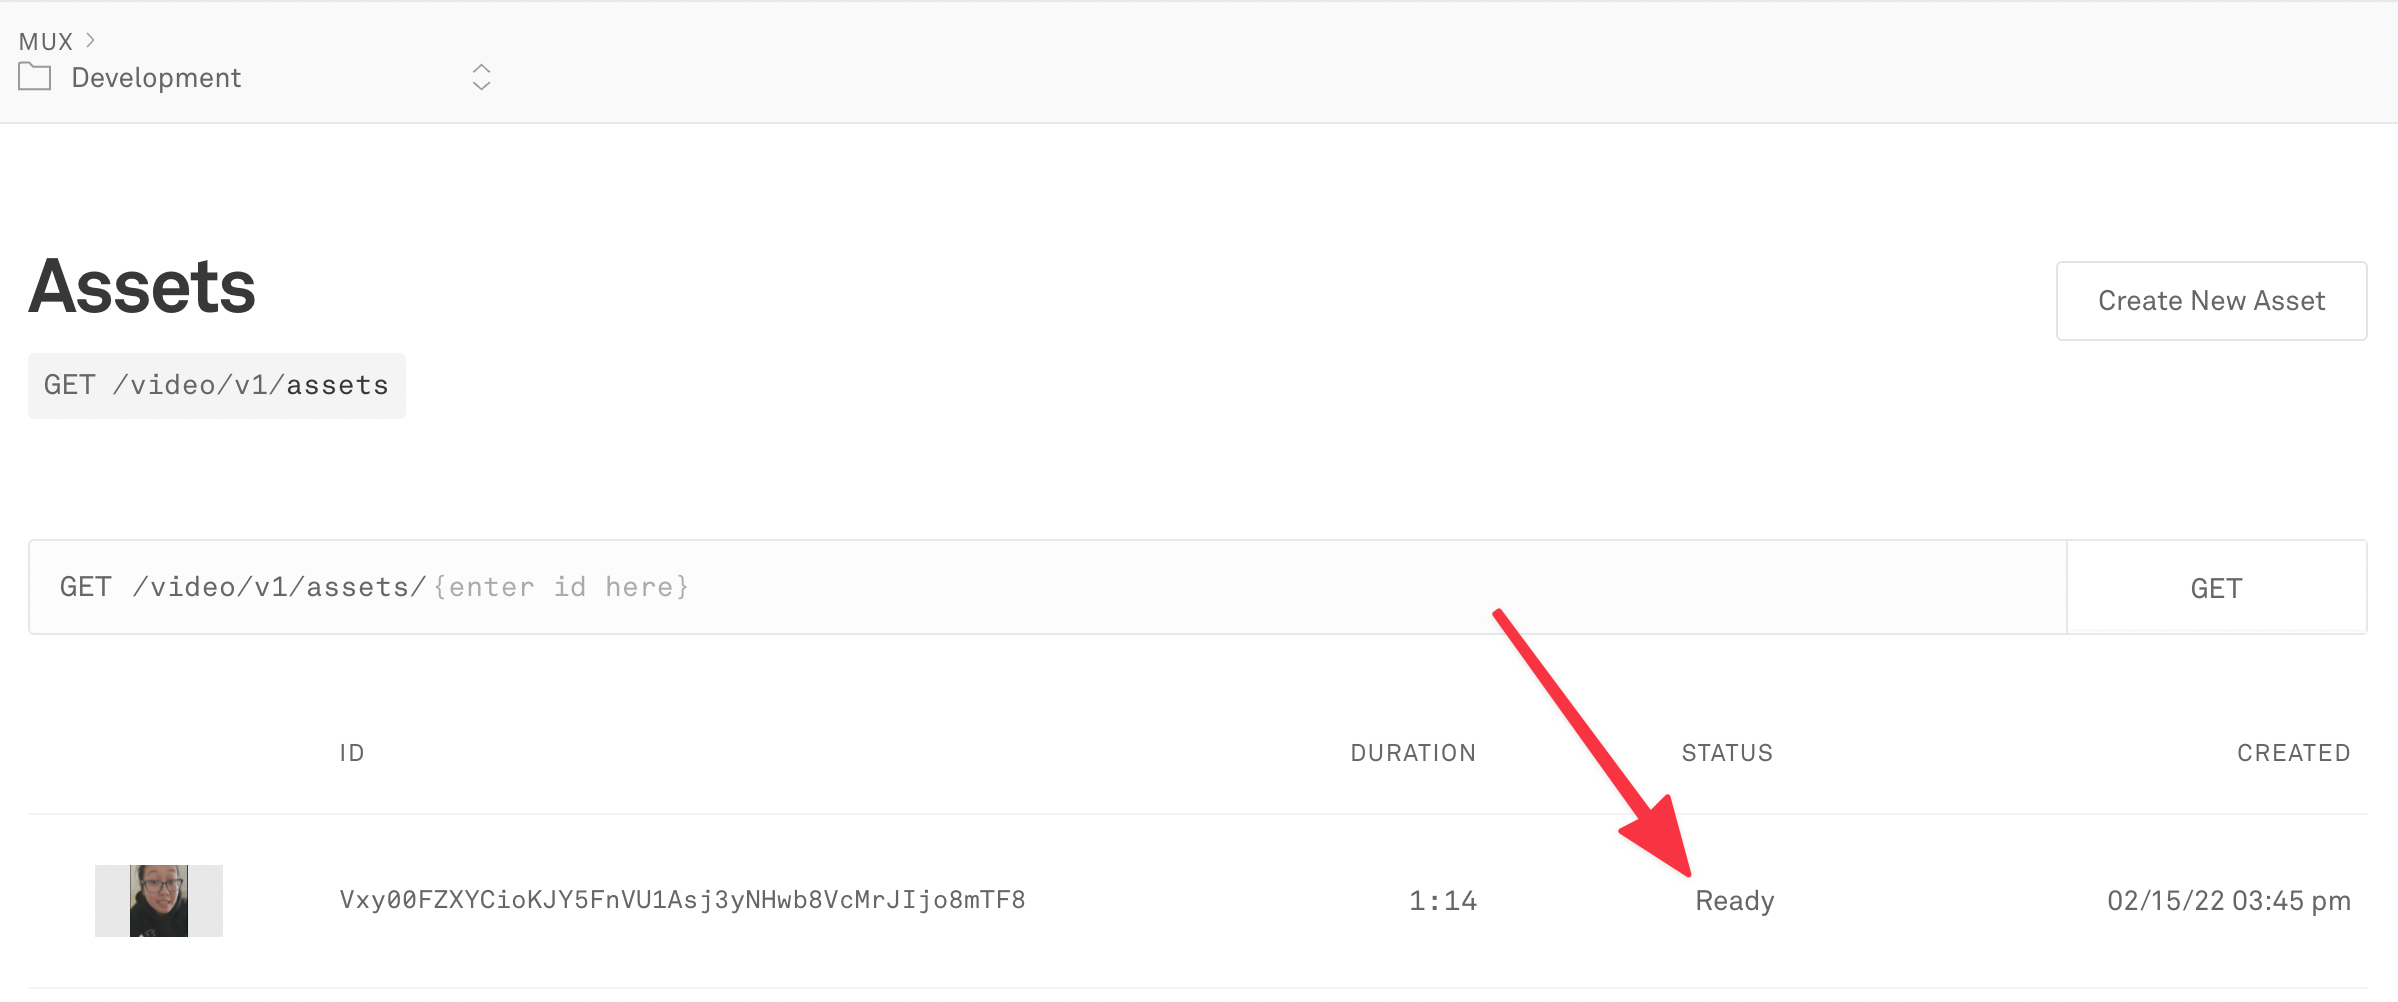
If you’re doing a quick test and not interested in polling (because you’re building in production) or if you’re not ready to implement webhooks, you can go with this option. Once you’ve selected a file for upload, go into your Mux Dashboard under the Video section in the left-hand menu and click “Assets.”

You’ll see a list of assets and their statuses by environment.
When your video has uploaded successfully, it will show up here with a status of “Ready.” ✅
Celebration time! Look how far you’ve come! 🥂

By this point, you’ve created an endpoint in an Express server that will return to a React client an authenticated URL from Mux. You’ve written logic to upload the video you’ve selected via an upload button to that authenticated URL. You’ve also learned how to verify your upload was a success via polling as well as the Mux Dashboard, and learned about Upchunk to boot!
Now all you’ve gotta do is get out there and start uploading! ✨