Instagram, TikTok, YouTube, Snapchat, and Mux customer VSCO make uploading, editing, and fine-tuning videos a piece of cake, which has shaped consumer expectations: they want nothing less than a smooth and sophisticated video creation experience. From travel to fitness, most community apps have a video experience — or will add one before long. Mux removes all the friction from video uploads and playback to any device — but what about the video editing experience?
Our partner Shotstack is a cloud-based video editing platform that developers and marketers use to enhance, personalize, and automate video production. Simultaneous use of Shotstack and Mux makes it easy to build complete video workflows and combine uploads and edits, fully branded, inside an app or product.
In the guide below, Jeff Shillito from Shotstack will walk you through how to set up a sample community fitness video app, but you could use the same approach for traveler videos, restaurant and small business reviews, local neighbor communities, and creator platform apps — or any other product that enables customer or community-created videos.
Stride fitness app example
This guide will use a fictitious mobile fitness app, Stride, to demonstrate the power and versatility of combining Shotstack and Mux. Stride is a typical fitness app that records a user’s sporting activity.
The app also includes a feature that allows users to record, upload, edit, and share a 20-second video filmed during or after their fitness activity. To illustrate, let’s imagine a user who just completed a short run and made a short video of themselves as they reached the end of it. Mux ingests, encodes, and stores the UGC footage from the video clip they recorded, and Shotstack generates a branded video using that footage, brand-aligned graphics, and the data generated during the run (things like distance, steps, heart rate).
For simplicity, let’s imagine a user has just completed a short run and made a short video of themselves. The video clip will be merged with data collected by the app, including distance, steps, heart rate, and a title. It will be displayed in a newly rendered video, generated by a Shotstack template.
Even better, Shotstack’s templates can be reused. To demonstrate, we will generate another video created by another user with different source videos and data but the same template.
Application workflow overview
The application comprises the following components:
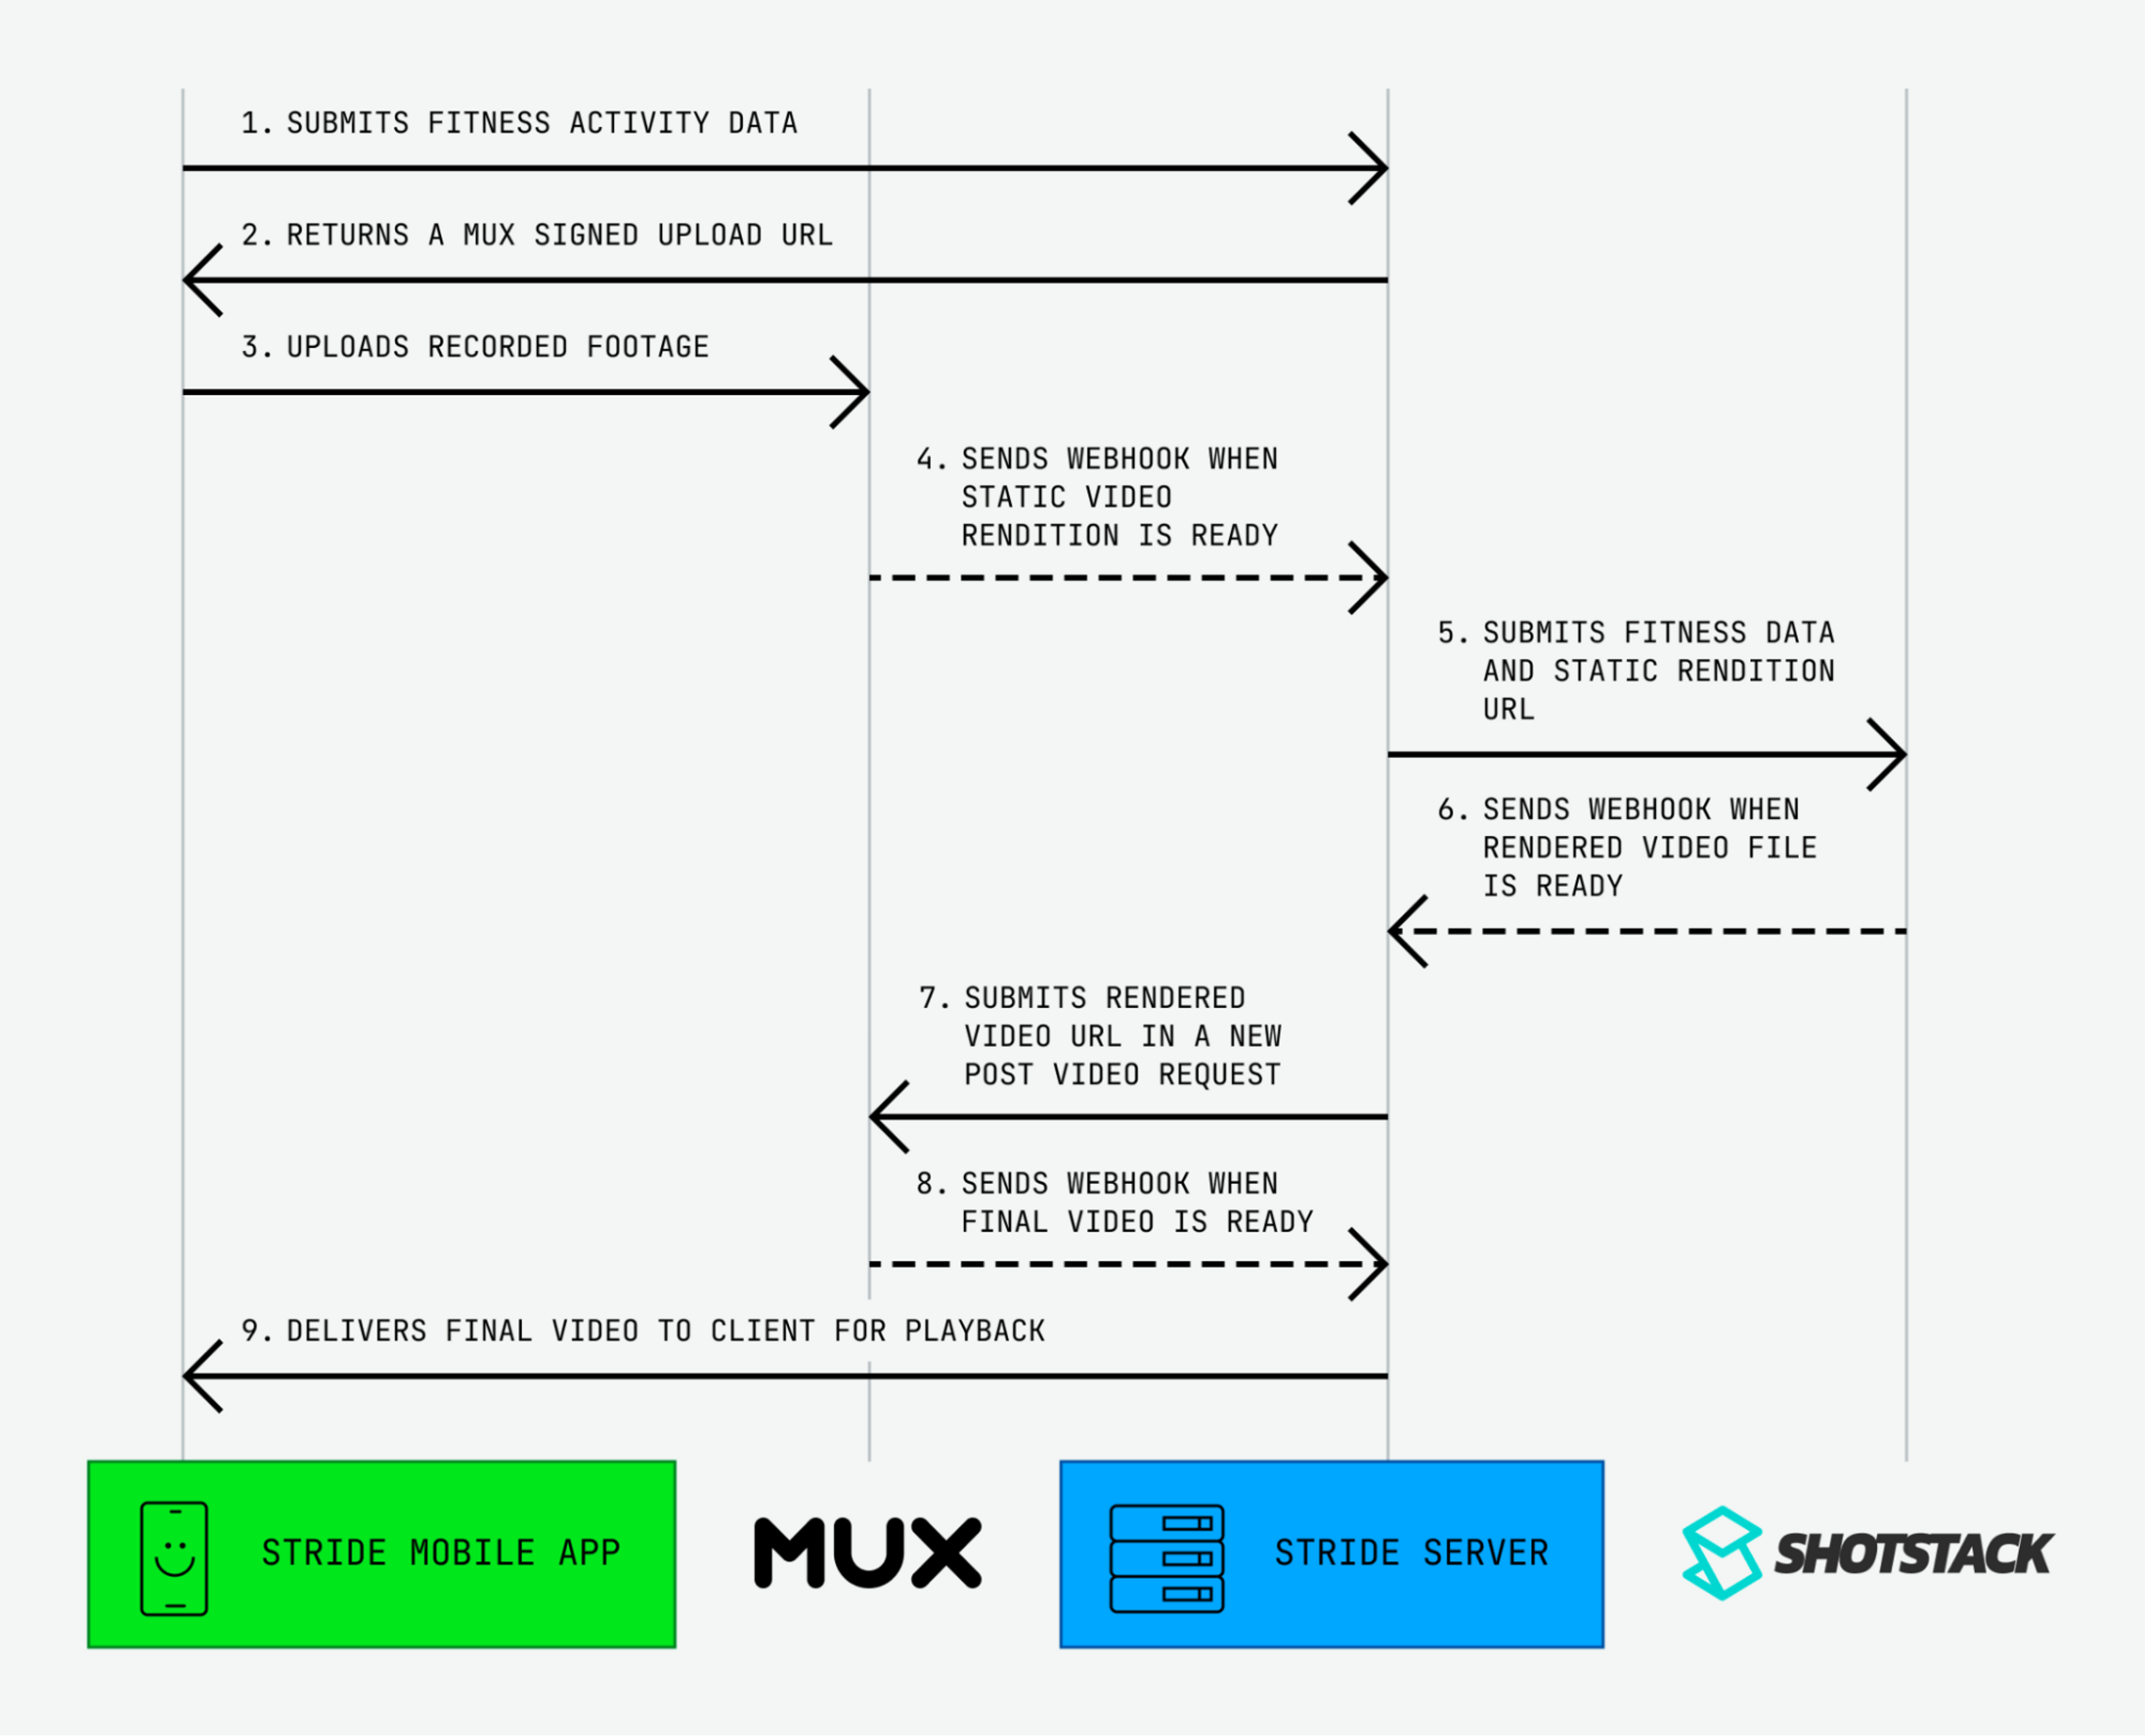
Stride Mobile App - Records footage and sends it to Mux. It also sends fitness activity data and saves it to the Stride Server. The app can be used as a gallery of user-generated videos and has the capability of sharing on social networks.
Stride Server - Orchestrates the requests among the mobile app, Mux, and Shotstack and serves as a central database to store video information and fitness activity data. Users can be notified once the video processing is finished and the video is ready to view and share.
Mux - Processes, transcodes, stores, and streams the video source footage and the final output video. Once the final rendered video is ready to view, Mux can notify the Stride Server using a webhook.
Shotstack - Renders a video by combining motion graphics, source footage from Mux, and data from the Stride Server. The final video is sent back to Mux for hosting and streaming.
Designing a video edit template in Shotstack
Before a user can generate a compiled video in Shotstack, they must design and save a reusable template. The easiest way to create a video template is to use the Shotstack Studio, a browser-based video editor.
The template will include merge fields placeholders that act like variables whose data can be swapped for each video generated. The user's uploaded video URL will populate one of the merge fields, and the title and fitness activity data will populate a set of text-based placeholders.
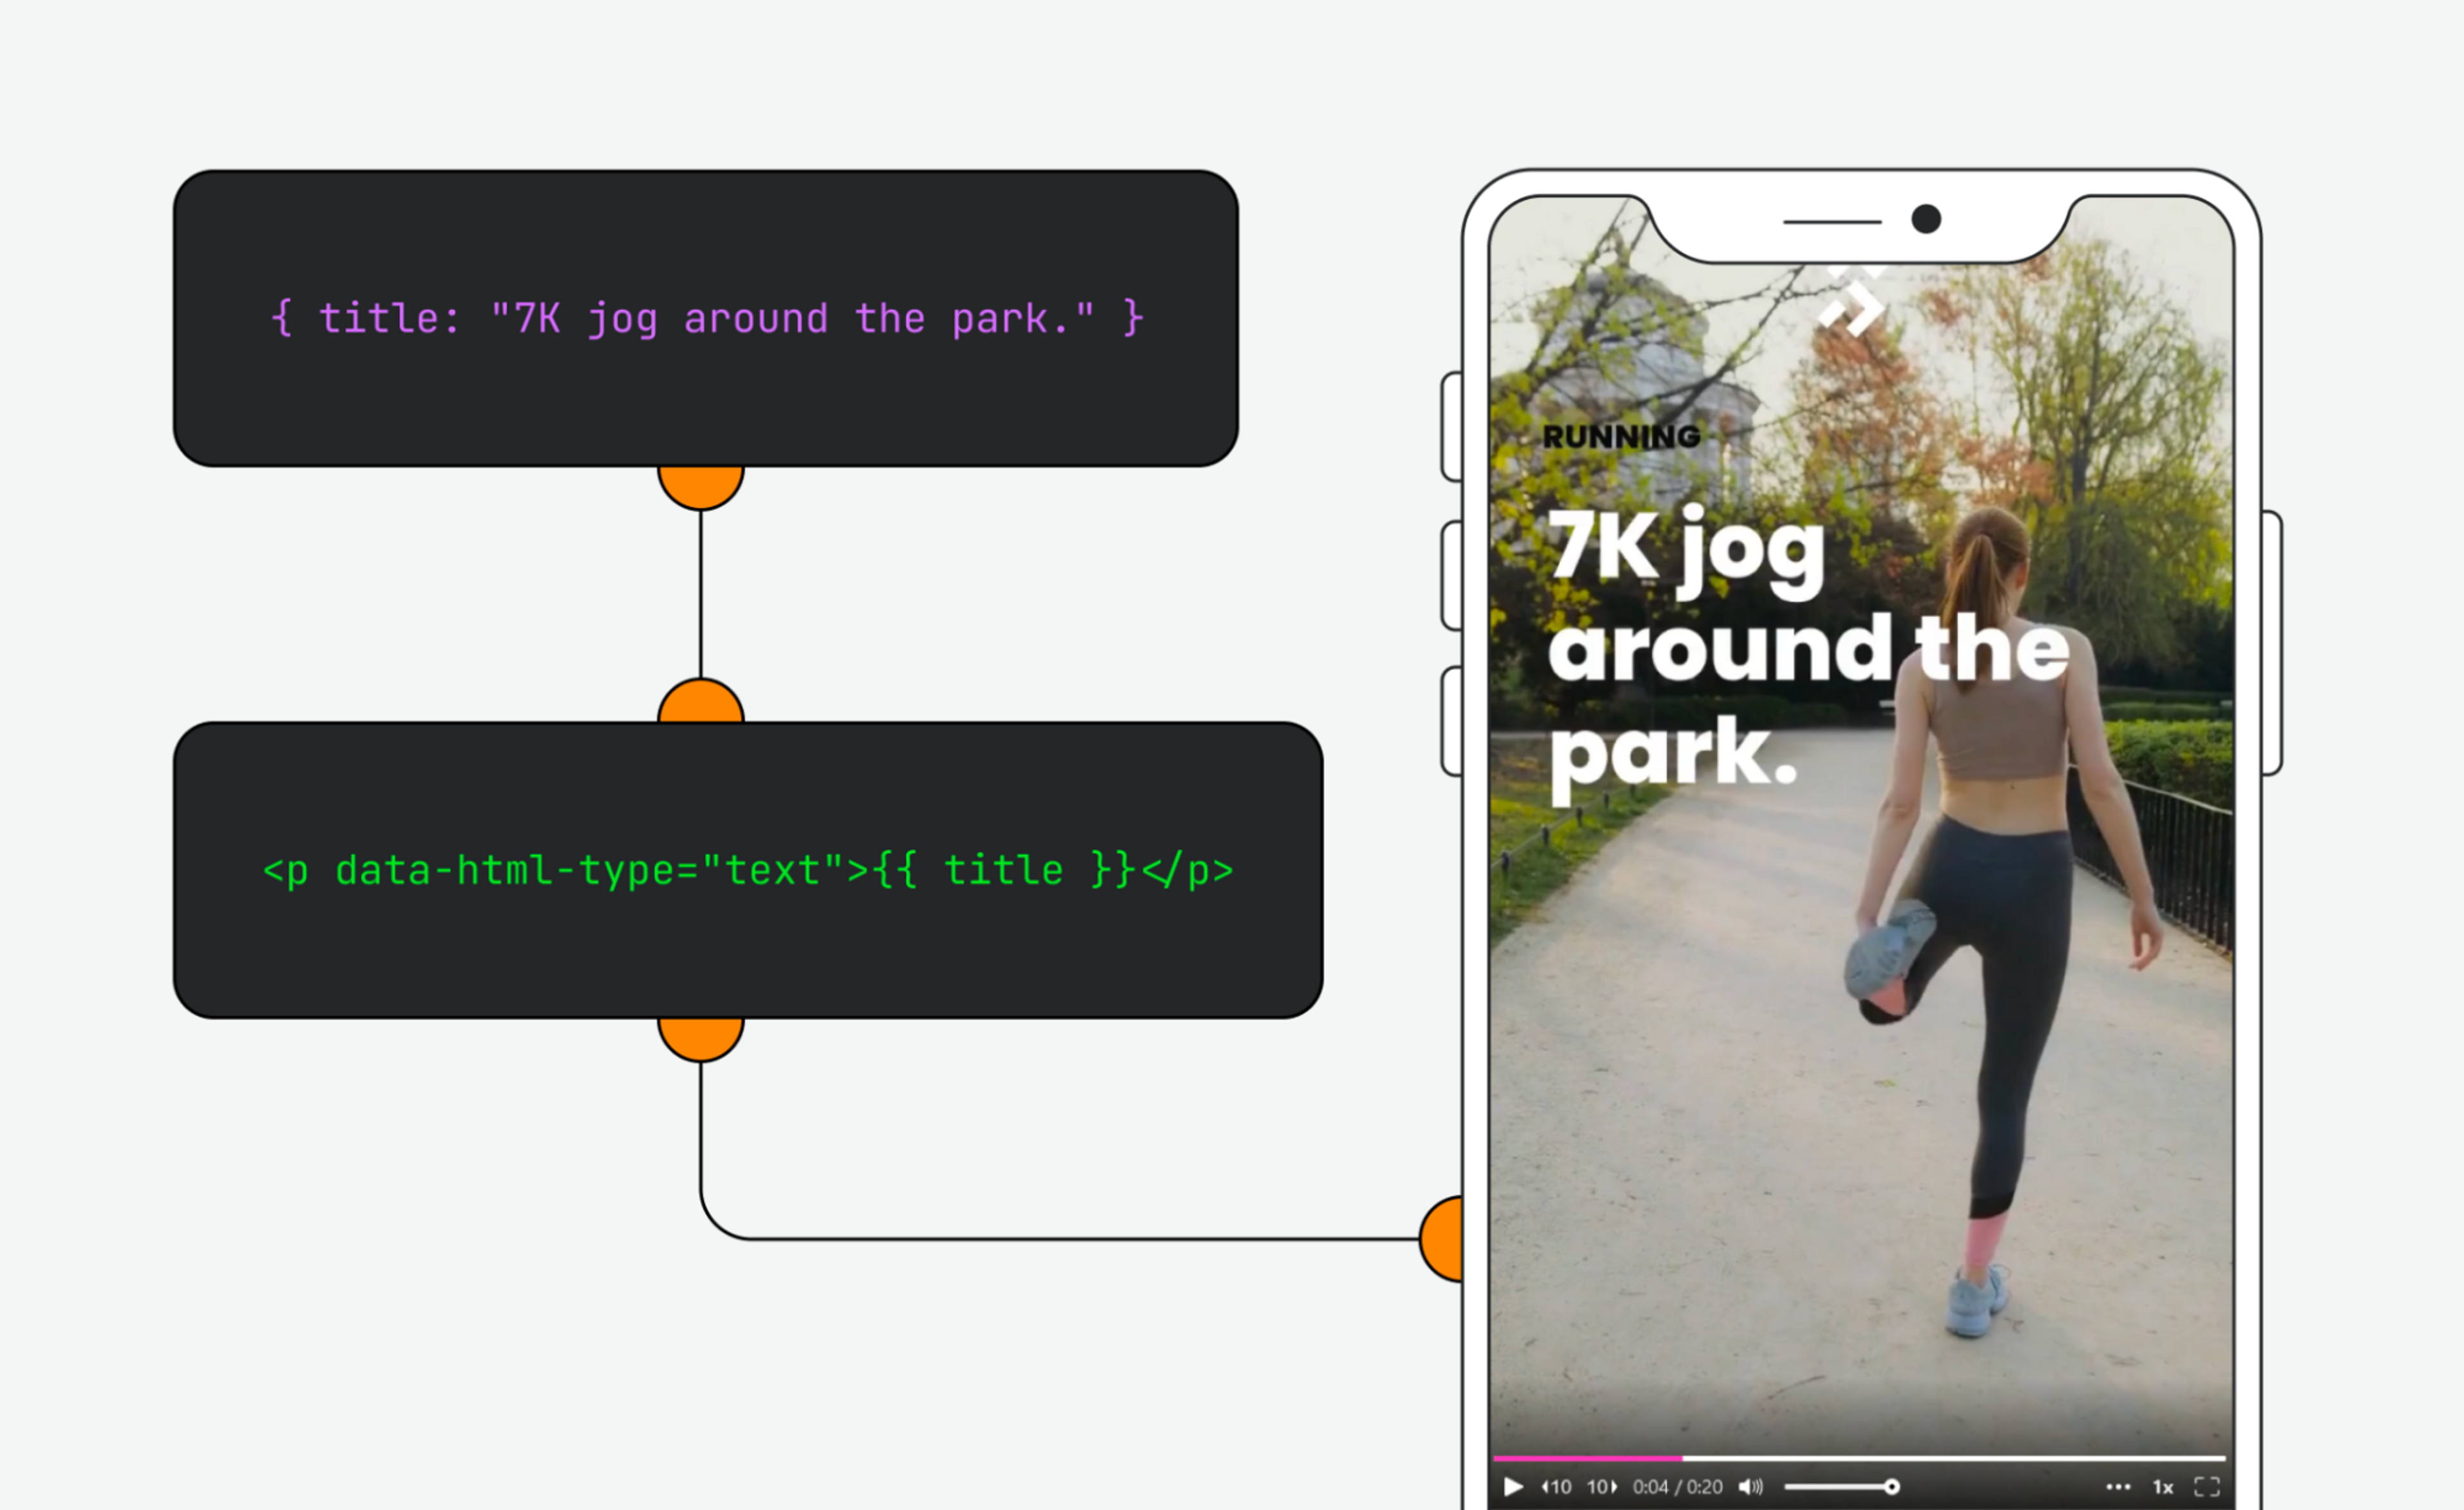
We created a 20-second video template for this tutorial to streamline the design step. The template was designed using the video editor, but the final template is a JSON file.
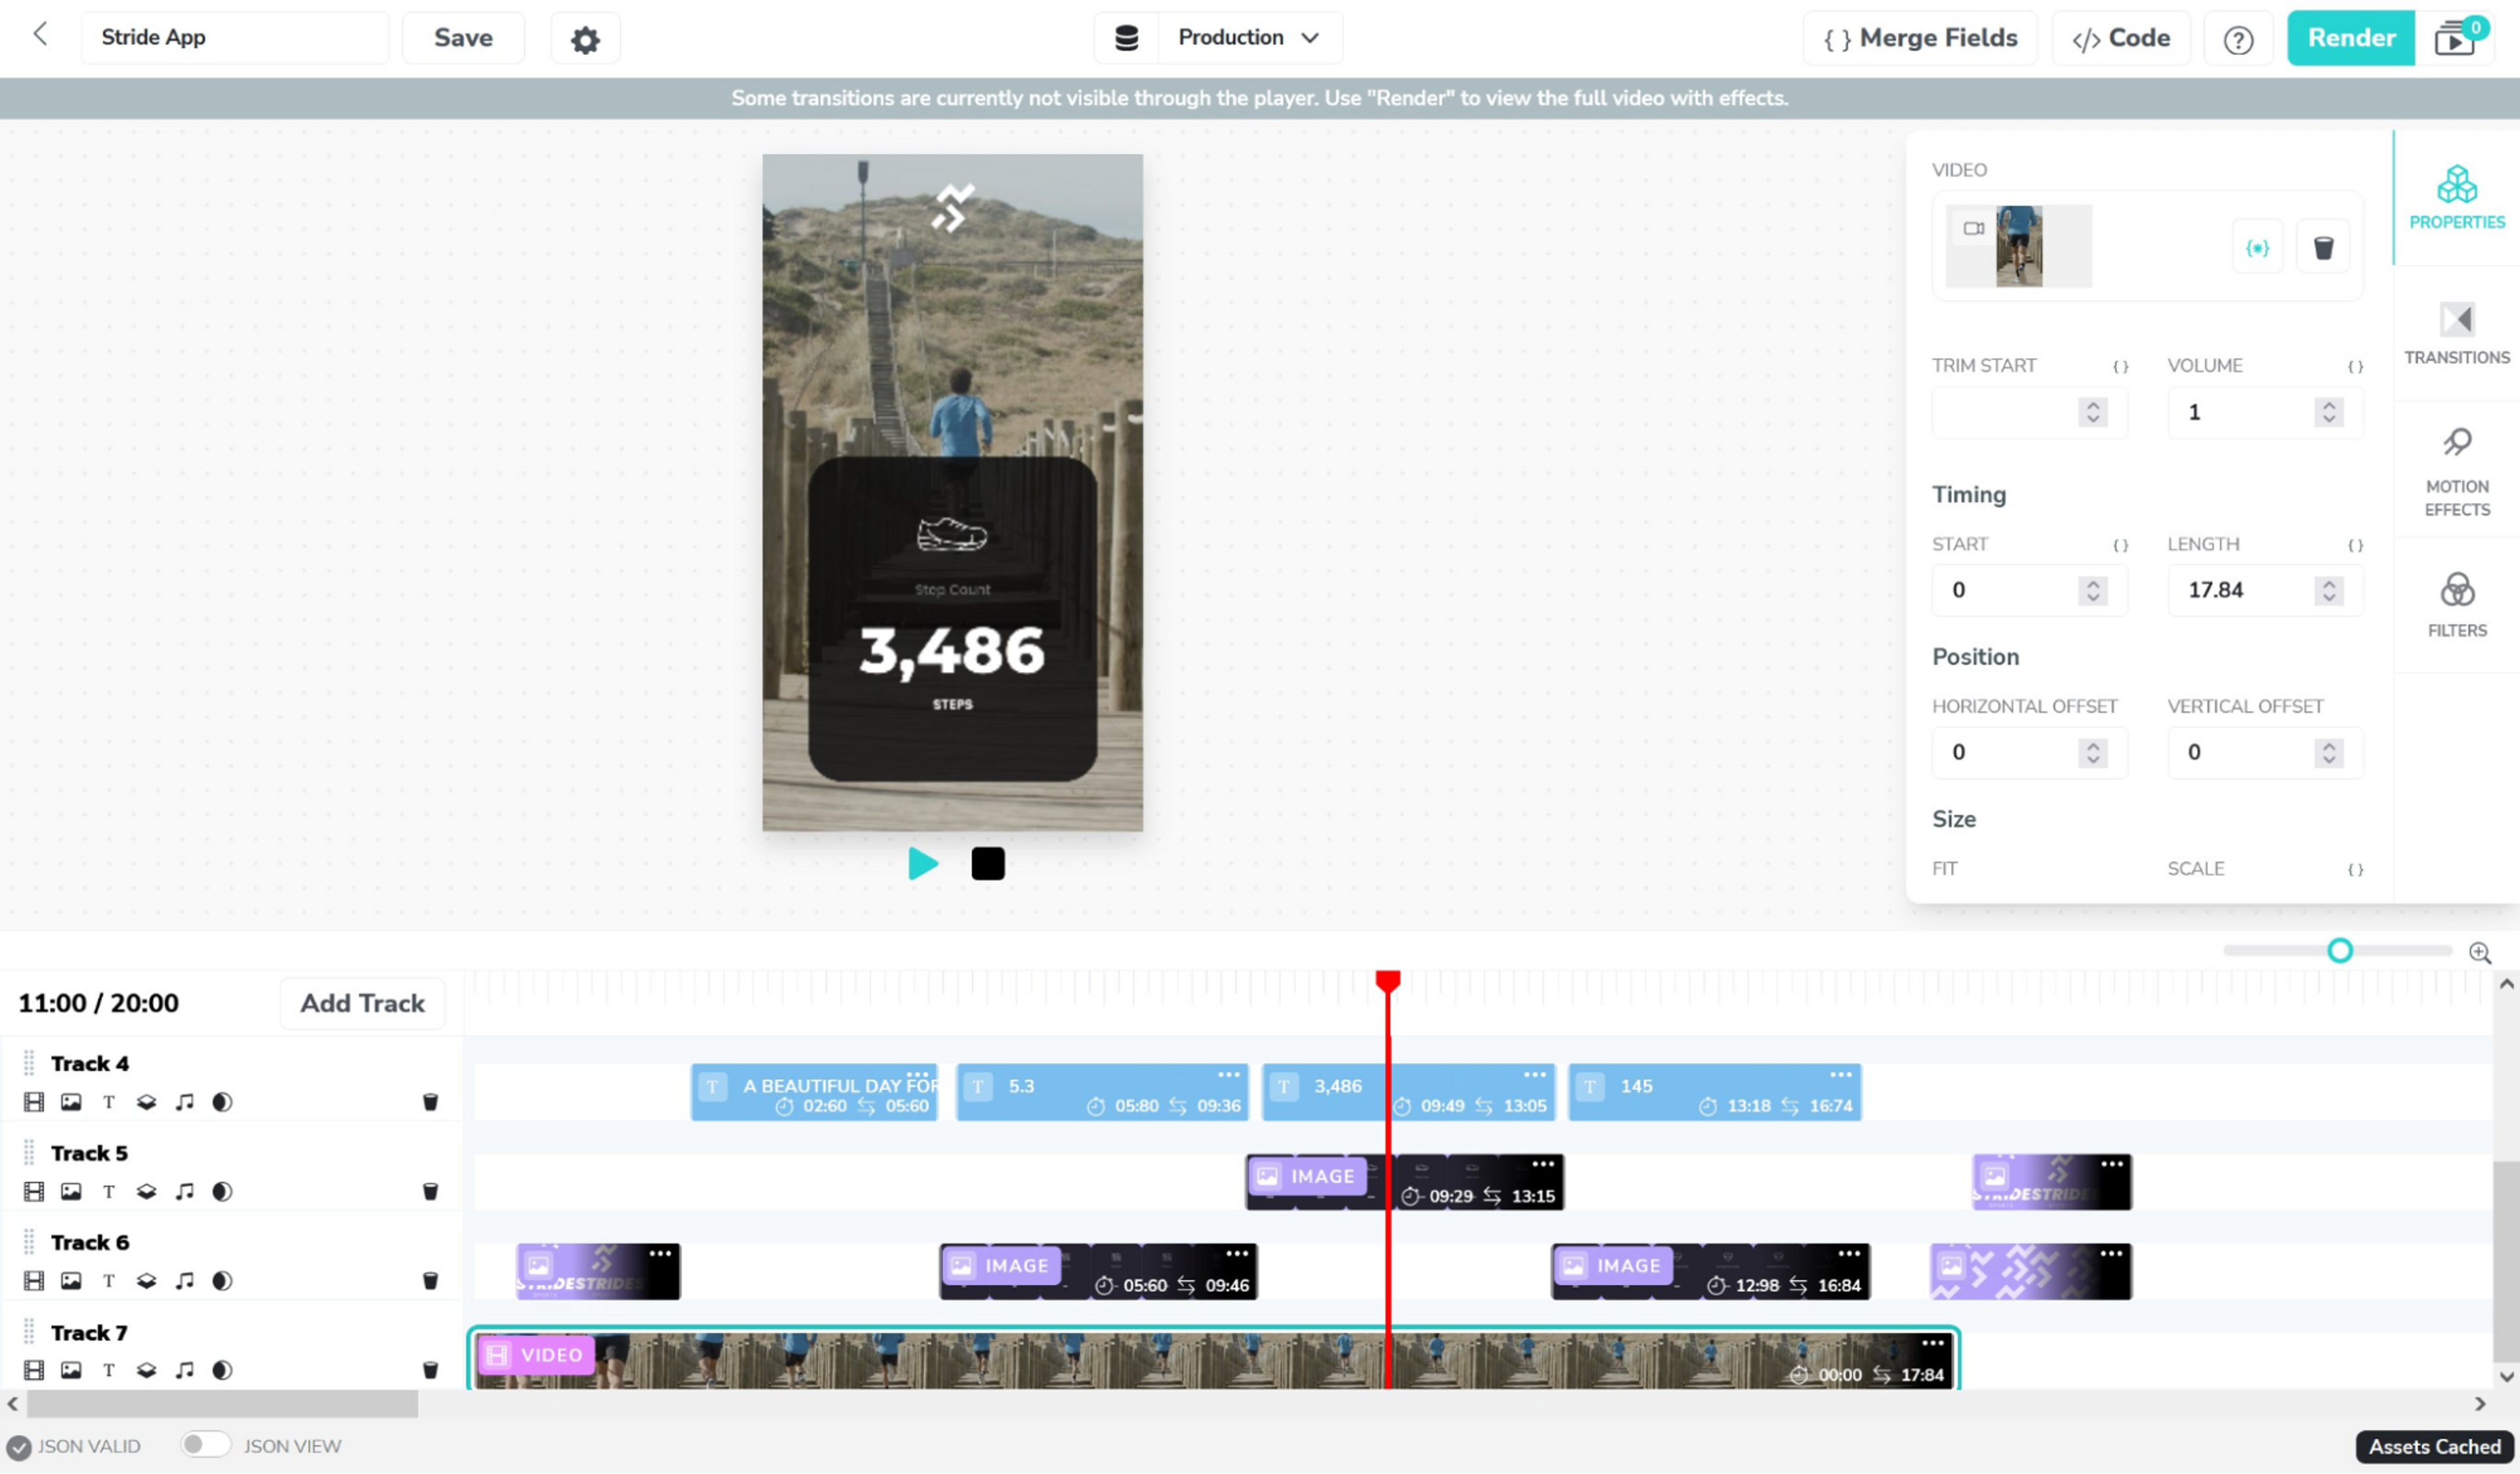
A template in Shotstack is a JSON description of the video sequences, layout, and transitions. The JSON below is the template we designed and saved in Shotstack with a template ID so we can use it later. The JSON includes merge fields that will merge assets and data.
{
"timeline": {
"fonts": [
{
"src": "https://shotstack-ingest-api-v1-sources.s3.ap-southeast-2.amazonaws.com/msgtwx8iw6/zzy98loz-2pho-xg30-by7k-1lzrlp3lajtu/source.ttf"
},
{
"src": "https://shotstack-ingest-api-v1-sources.s3.ap-southeast-2.amazonaws.com/msgtwx8iw6/zzy98lhu-1pxc-qy3l-rlmv-3gv00e4s5a13/source.ttf"
}
],
"background": "#000000",
"tracks": [
{
"clips": [
{
"asset": {
"type": "audio",
"src": "https://shotstack-ingest-api-v1-sources.s3.ap-southeast-2.amazonaws.com/msgtwx8iw6/zzy98esv-4h7e-b50a-zhnx-4fzrbj0x7sd9/source.mp3",
"volume": 1
},
"start": 0,
"length": 20
}
]
},
{
"clips": [
{
"asset": {
"type": "image",
"src": "https://shotstack-ingest-api-v1-sources.s3.ap-southeast-2.amazonaws.com/msgtwx8iw6/zzy98ea7-2kxb-7r2s-mvcl-2zunyw0gthsl/source.png"
},
"length": 15.39,
"offset": {
"x": 0,
"y": 0.42
},
"position": "center",
"fit": "none",
"transition": {
"in": "fade",
"out": "fade"
},
"start": 2.5
}
]
},
{
"clips": [
{
"asset": {
"type": "html",
"width": 638,
"height": 46,
"html": "<p data-html-type=\"text\">{{ SPORT }}</p>",
"css": "p { color: #0a0a0a; font-size: 32px; font-family: \"Poppins ExtraBold\"; text-align: left; }"
},
"start": 2.5,
"fit": "none",
"scale": 1,
"offset": {
"x": 0.013,
"y": 0.308
},
"position": "center",
"transition": {
"in": "slideRight",
"out": "slideLeft"
},
"length": 3
}
]
},
{
"clips": [
{
"asset": {
"type": "html",
"width": 603,
"height": 880,
"html": "<p data-html-type=\"text\">{{ TITLE }}</p>",
"css": "p { color: #ffffff; font-size: 88px; font-family: \"Poppins ExtraBold\"; text-align: left; line-height: 75; }",
"position": "top"
},
"fit": "none",
"scale": 1,
"offset": {
"x": -0.005,
"y": -0.065
},
"position": "center",
"start": 2.6,
"transition": {
"in": "slideRight",
"out": "slideLeft"
},
"length": 3
},
{
"asset": {
"type": "html",
"width": 490,
"height": 145,
"html": "<p data-html-type=\"text\">{{ DISTANCE }}</p>",
"css": "p { color: #ffffff; font-size: 120px; font-family: \"Poppins ExtraBold\"; text-align: center; }"
},
"offset": {
"x": 0,
"y": -0.227
},
"fit": "none",
"scale": 1,
"position": "center",
"transition": {
"in": "slideLeft",
"out": "slideLeft"
},
"start": 5.8,
"length": 3.56
},
{
"asset": {
"type": "html",
"width": 490,
"height": 145,
"html": "<p data-html-type=\"text\">{{ STEPS }}</p>",
"css": "p { color: #ffffff; font-size: 120px; font-family: \"Montserrat ExtraBold\"; text-align: center; }"
},
"start": 9.49,
"fit": "none",
"scale": 1,
"offset": {
"x": 0,
"y": -0.227
},
"position": "center",
"transition": {
"in": "slideLeft",
"out": "slideLeft"
},
"length": 3.56
},
{
"asset": {
"type": "html",
"width": 490,
"height": 145,
"html": "<p data-html-type=\"text\">{{ HEARTRATE }}</p>",
"css": "p { color: #ffffff; font-size: 120px; font-family: \"Poppins ExtraBold\"; text-align: center; }"
},
"offset": {
"x": 0,
"y": -0.227
},
"fit": "none",
"scale": 1,
"position": "center",
"transition": {
"in": "slideLeft",
"out": "slideLeft"
},
"start": 13.18,
"length": 3.56
}
]
},
{
"clips": [
{
"asset": {
"type": "image",
"src": "https://shotstack-ingest-api-v1-sources.s3.ap-southeast-2.amazonaws.com/msgtwx8iw6/zzy98edv-1mvf-lj0n-qkbg-2qjxis0rzt4l/source.png"
},
"start": 9.29,
"offset": {
"x": 0,
"y": -0.186
},
"position": "center",
"fit": "none",
"transition": {
"in": "carouselLeftFast",
"out": "carouselLeftFast"
},
"length": 3.86
},
{
"asset": {
"type": "image",
"src": "https://shotstack-ingest-api-v1-sources.s3.ap-southeast-2.amazonaws.com/msgtwx8iw6/zzy98ltv-1k7g-bm3b-aahn-2l7a0x2slga8/source.png"
},
"start": 18.06,
"fit": "none",
"transition": {
"in": "fade"
},
"length": 1.94,
"offset": {
"x": 0,
"y": 0
},
"position": "center"
}
]
},
{
"clips": [
{
"asset": {
"type": "image",
"src": "https://shotstack-ingest-api-v1-sources.s3.ap-southeast-2.amazonaws.com/msgtwx8iw6/zzy98ltv-1k7g-bm3b-aahn-2l7a0x2slga8/source.png"
},
"offset": {
"x": 0,
"y": 0.245
},
"position": "center",
"transition": {
"in": "fade",
"out": "fade"
},
"fit": "none",
"start": 0.5,
"length": 2
},
{
"asset": {
"type": "image",
"src": "https://shotstack-ingest-api-v1-sources.s3.ap-southeast-2.amazonaws.com/msgtwx8iw6/zzy98ejk-2nen-wp00-gxwn-1lujpy34uakv/source.png"
},
"offset": {
"x": 0,
"y": -0.186
},
"position": "center",
"fit": "none",
"transition": {
"in": "carouselLeftFast",
"out": "carouselLeftFast"
},
"length": 3.86,
"start": 5.6
},
{
"asset": {
"type": "image",
"src": "https://shotstack-ingest-api-v1-sources.s3.ap-southeast-2.amazonaws.com/msgtwx8iw6/zzy98edr-4yzu-u707-iuxq-2pzvkl04p5gv/source.png"
},
"fit": "none",
"offset": {
"x": 0,
"y": -0.186
},
"position": "center",
"transition": {
"in": "carouselLeftFast",
"out": "carouselLeftFast"
},
"length": 3.86,
"start": 12.98
},
{
"asset": {
"type": "image",
"src": "https://shotstack-ingest-api-v1-sources.s3.ap-southeast-2.amazonaws.com/msgtwx8iw6/zzy98ecf-4qf0-mk34-optk-0oankg2bc9y3/source.png"
},
"start": 17.54,
"length": 2.46,
"offset": {
"x": -0.017,
"y": -0.077
},
"position": "center",
"fit": "none",
"transition": {
"in": "fade"
},
"opacity": 0.15
}
]
},
{
"clips": [
{
"asset": {
"type": "video",
"src": "{{ VIDEO }}",
"volume": 1
},
"start": 0,
"offset": {
"x": 0,
"y": 0
},
"position": "center",
"transition": {
"in": "fade",
"out": "fade"
},
"length": 17.84,
"scale": 1
}
]
}
]
},
"output": {
"size": {
"width": 720,
"height": 1280
},
"format": "mp4"
},
"merge": [
{
"find": "VIDEO",
"replace": "https://stream.mux.com/ck2XKwDHexeVgGD600gXXrOQaTGHTtZ54fBGvfU0002O00M/high.mp4"
},
{
"find": "DISTANCE",
"replace": "5.3"
},
{
"find": "STEPS",
"replace": "3,486"
},
{
"find": "HEARTRATE",
"replace": "145"
},
{
"find": "SPORT",
"replace": "RUNNING"
},
{
"find": "TITLE",
"replace": "A beautiful day for a run."
}
]
}If you want to follow along, you can copy the JSON, create a new template in Shotstack Studio, and paste the code into the JSON view, which can be accessed via the JSON View toggle in the bottom left-hand corner:

When you’ve saved the template, a template ID is generated and can be used later in the workflow. You can find the template ID in the templates list page:

In this example, the template ID is 6661a3f8-62ad-4651-8f84-57066f6b287e.
Uploading footage to Mux from the app
The first step in the workflow is to record your footage and send it to Mux via the app UI. To do so, select a video from the user gallery. Once selected, you must submit the data for the video to the Stride Server and save it to a database.
Once the data is saved to the Stride Server, the server will make a request to Mux for a signed URL. The signed URL is part of the Mux direct upload technique and must be returned back to the Stride mobile app.
The direct upload process is documented in detail within the Mux documentation. It requires a request like below (using cURL):
curl https://api.mux.com/video/v1/uploads \
  -X POST \
  -H "Content-Type: application/json" \
  -u MUX_TOKEN_ID:MUX_TOKEN_SECRET \
  -d '{ "new_asset_settings": { "playback_policy": ["public"], "mp4_support": "standard" } }'
MUX_TOKEN_ID and MUX_TOKEN_SECRET are credentials you can find in your Mux Dashboard.
It is also important to note that the request uses the parameter mp4_support, which is set to standard. This ensures the source footage is saved as a single MP4 file instead of using the default HLS (.m3u8) streaming format.
That is because Shotstack, and video editing software in general, only supports static video files like mp4. Mux calls these files static mp4 renditions.
The request above will return a payload with a URL to upload the video using a signed request.
The app then uses this URL to upload the video to Mux, making a call similar to the following (again using cURL):
curl -v -X PUT -T myawesomevideo.mp4 "$URL_FROM_STEP_ONE"Once you’ve uploaded the video and Mux has processed it, a webhook is returned with an event type of video.asset.static_renditions.ready to the Stride Server, triggering the next step in the workflow: generating the video with Shotstack.
Generating the video using Shotstack
Once the Stride Server receives the webhook from Mux, it will include a set of video source files that Shotstack can use in the video template to generate a video.
The video source files are named low.mp4, medium.mp4, and high.mp4. Each one represents a different resolution. For our edit, we will use a high-resolution video. You may need to parse the webhook response and check the width and height, but for simplicity, we will use the final source video URL, which uses the following format:
https://stream.mux.com/{PLAYBACK_ID}.high.mp4
For this guide, we uploaded a video to the following location:
https://stream.mux.com/ck2XKwDHexeVgGD600gXXrOQaTGHTtZ54fBGvfU0002O00M/high.mp4
Along with the data saved in the Stride Server database, we can now use the template ID that Shotstack created earlier (6661a3f8-62ad-4651-8f84-57066f6b287e) and merge fields to generate and render a video. In the Shotstack Studio editor, open the template and click on the code button:
You will see a code snippet window that can output code in several languages (PHP, Node, Ruby, and Python) and can use either plain JSON or a template and merge field body. The easiest way to render a template is to use a template ID.
Here is what the cURL request would look like to create a video using the video we uploaded to Mux, a sport name, title, and activity data:
curl --request POST 'https://api.shotstack.io/SHOTSTACK_ENV/templates/render' \
--header 'content-type: application/json' \
--header 'x-api-key: SHOTSTACK_API_KEY' \
--data-raw '{
  "id": "SHOTSTACK_TEMPLATE_ID",
  "merge": [
    {
      "find": "VIDEO",
      "replace": "https://stream.mux.com/ck2XKwDHexeVgGD600gXXrOQaTGHTtZ54fBGvfU0002O00M/high.mp4"
    },
    {
      "find": "DISTANCE",
      "replace": "5.3"
    },
    {
      "find": "STEPS",
      "replace": "3,486"
    },
    {
      "find": "HEARTRATE",
      "replace": "145"
    },
    {
      "find": "SPORT",
      "replace": "RUNNING"
    },
    {
      "find": "TITLE",
      "replace": "A beautiful day for a run."
    }
  ]
}'
Ensure that SHOTSTACK_ENV is changed to either v1 or stage, depending on which environment you are using, SHOTSTACK_API_KEY uses the correct key for the environment, and SHOTSTACK_TEMPLATE_ID is set to the template ID we created earlier.
The request above will start the render process which merges the data into the template and returns a render ID. When the final video is ready, Shotstack will send a webhook to the Stride Server with a temporary URL of the output video file.
This video file can be fetched using Mux or Shotstack’s Mux destination.
Hosting the video with Mux and notifying the user
Once the Shotstack webhook has notified the Stride Server that the rendered file is ready, it will receive a payload that looks like this:
{
    "type": "edit",
    "action": "render",
    "id": "6d7acbe6-e7c1-4cf8-b8ea-94e7522878cc",
    "owner": "mwipwx4ds3",
    "status": "done",
    "url": "https://shotstack-api-v1-output.s3-ap-southeast-2.amazonaws.com/mwipwx4ds3/6d7acbe6-e7c1-4cf8-b8ea-94e7522878cc.mp4",
    "error": null,
    "completed": "2020-02-24T11:52:20.810Z"
}
The URL in the payload is a temporary video file that can be fetched using the Mux API like any other video file and is hosted as an HLS (.m3u8) stream.
The Mux docs explain how to POST a video, but the request you’ll send looks like this (using cURL):
curl https://api.mux.com/video/v1/assets \
  -H "Content-Type: application/json" \
  -X POST \
  -d '{ "input": " https://shotstack-api-v1-output.s3-ap-southeast-2.amazonaws.com/mwipwx4ds3/6d7acbe6-e7c1-4cf8-b8ea-94e7522878cc.mp4", "playback_policy": "public" }' \
  -u ${MUX_TOKEN_ID}:${MUX_TOKEN_SECRET}
Remember to use your Mux credentials and replace the input with the URL of the generated file.
Once again, you can use Mux webhooks to notify the Stride Server that the final video is available in Mux and can be displayed in the app and shared online.
Here is the final rendered video hosted on Mux:
Creating unique videos for every user
The power of Shotstack is its template-based approach to video editing. Using the Stride app, each user has their own UGC video file, title, and activity data and can easily create many videos each week. This could add up to thousands of unique videos generated every day by an app with a large user base.
To demonstrate how easy it is to generate multiple unique videos, you can modify the Shotstack request we sent earlier with a new UGC video file, title, and activity data like this:
curl --request POST 'https://api.shotstack.io/SHOTSTACK_ENV/templates/render' \
--header 'content-type: application/json' \
--header 'x-api-key: SHOTSTACK_API_KEY' \
--data-raw '{
  "id": "SHOTSTACK_TEMPLATE_ID",
  "merge": [
    {
            "find": "VIDEO",
            "replace": "https://stream.mux.com/FQrI6ANLVMwh01XSxmfEQiFoz01zc4jYbo4YVNS5GsWk4/high.mp4"
        },
        {
            "find": "DISTANCE",
            "replace": "7.8"
        },
        {
            "find": "STEPS",
            "replace": "5,012"
        },
        {
            "find": "HEARTRATE",
            "replace": "136"
        },
        {
            "find": "SPORT",
            "replace": "RUNNING"
        },
        {
            "find": "TITLE",
            "replace": "7K jog around the park."
        }
  ]
}'
Check out the final video below! By creating just a few parameters in the merge fields, you can create a unique video in a matter of seconds:
Building a real-world UGC app feature
This article has provided a high-level overview of the core functionality needed to build a UGC video application, feature, or campaign.
Shotstack complements Mux’s encoding and hosting services by providing video editing and motion graphics components that are not currently available in Mux. And, just like Mux, Shotstack takes an API-first approach to video, making it the ideal fit for developers who want to get started quickly without worrying about infrastructure or the complexities of video.


