Live streaming workflows come in all shapes and sizes. There are a lot of different technical solutions out there, each with its own merits and limitations, but fundamentally they all need to take care of the same 4 things:
- Ingest - provide a mechanism to send your video feed to your streaming provider
- Processing - taking your feed and turning it into a format which can be easily played back just about anywhere
- Delivery - distributing your video all over the internet to deliver your live feed at scale
- Playback - using a player technology which can receive and decode the live stream and display it on any number of devices
Regardless of how you choose to do it, getting the video into the platform of your choice remains a common consideration throughout. But what should you consider to ingest live video well? Glad you asked! Here’s our top 3 areas for consideration:
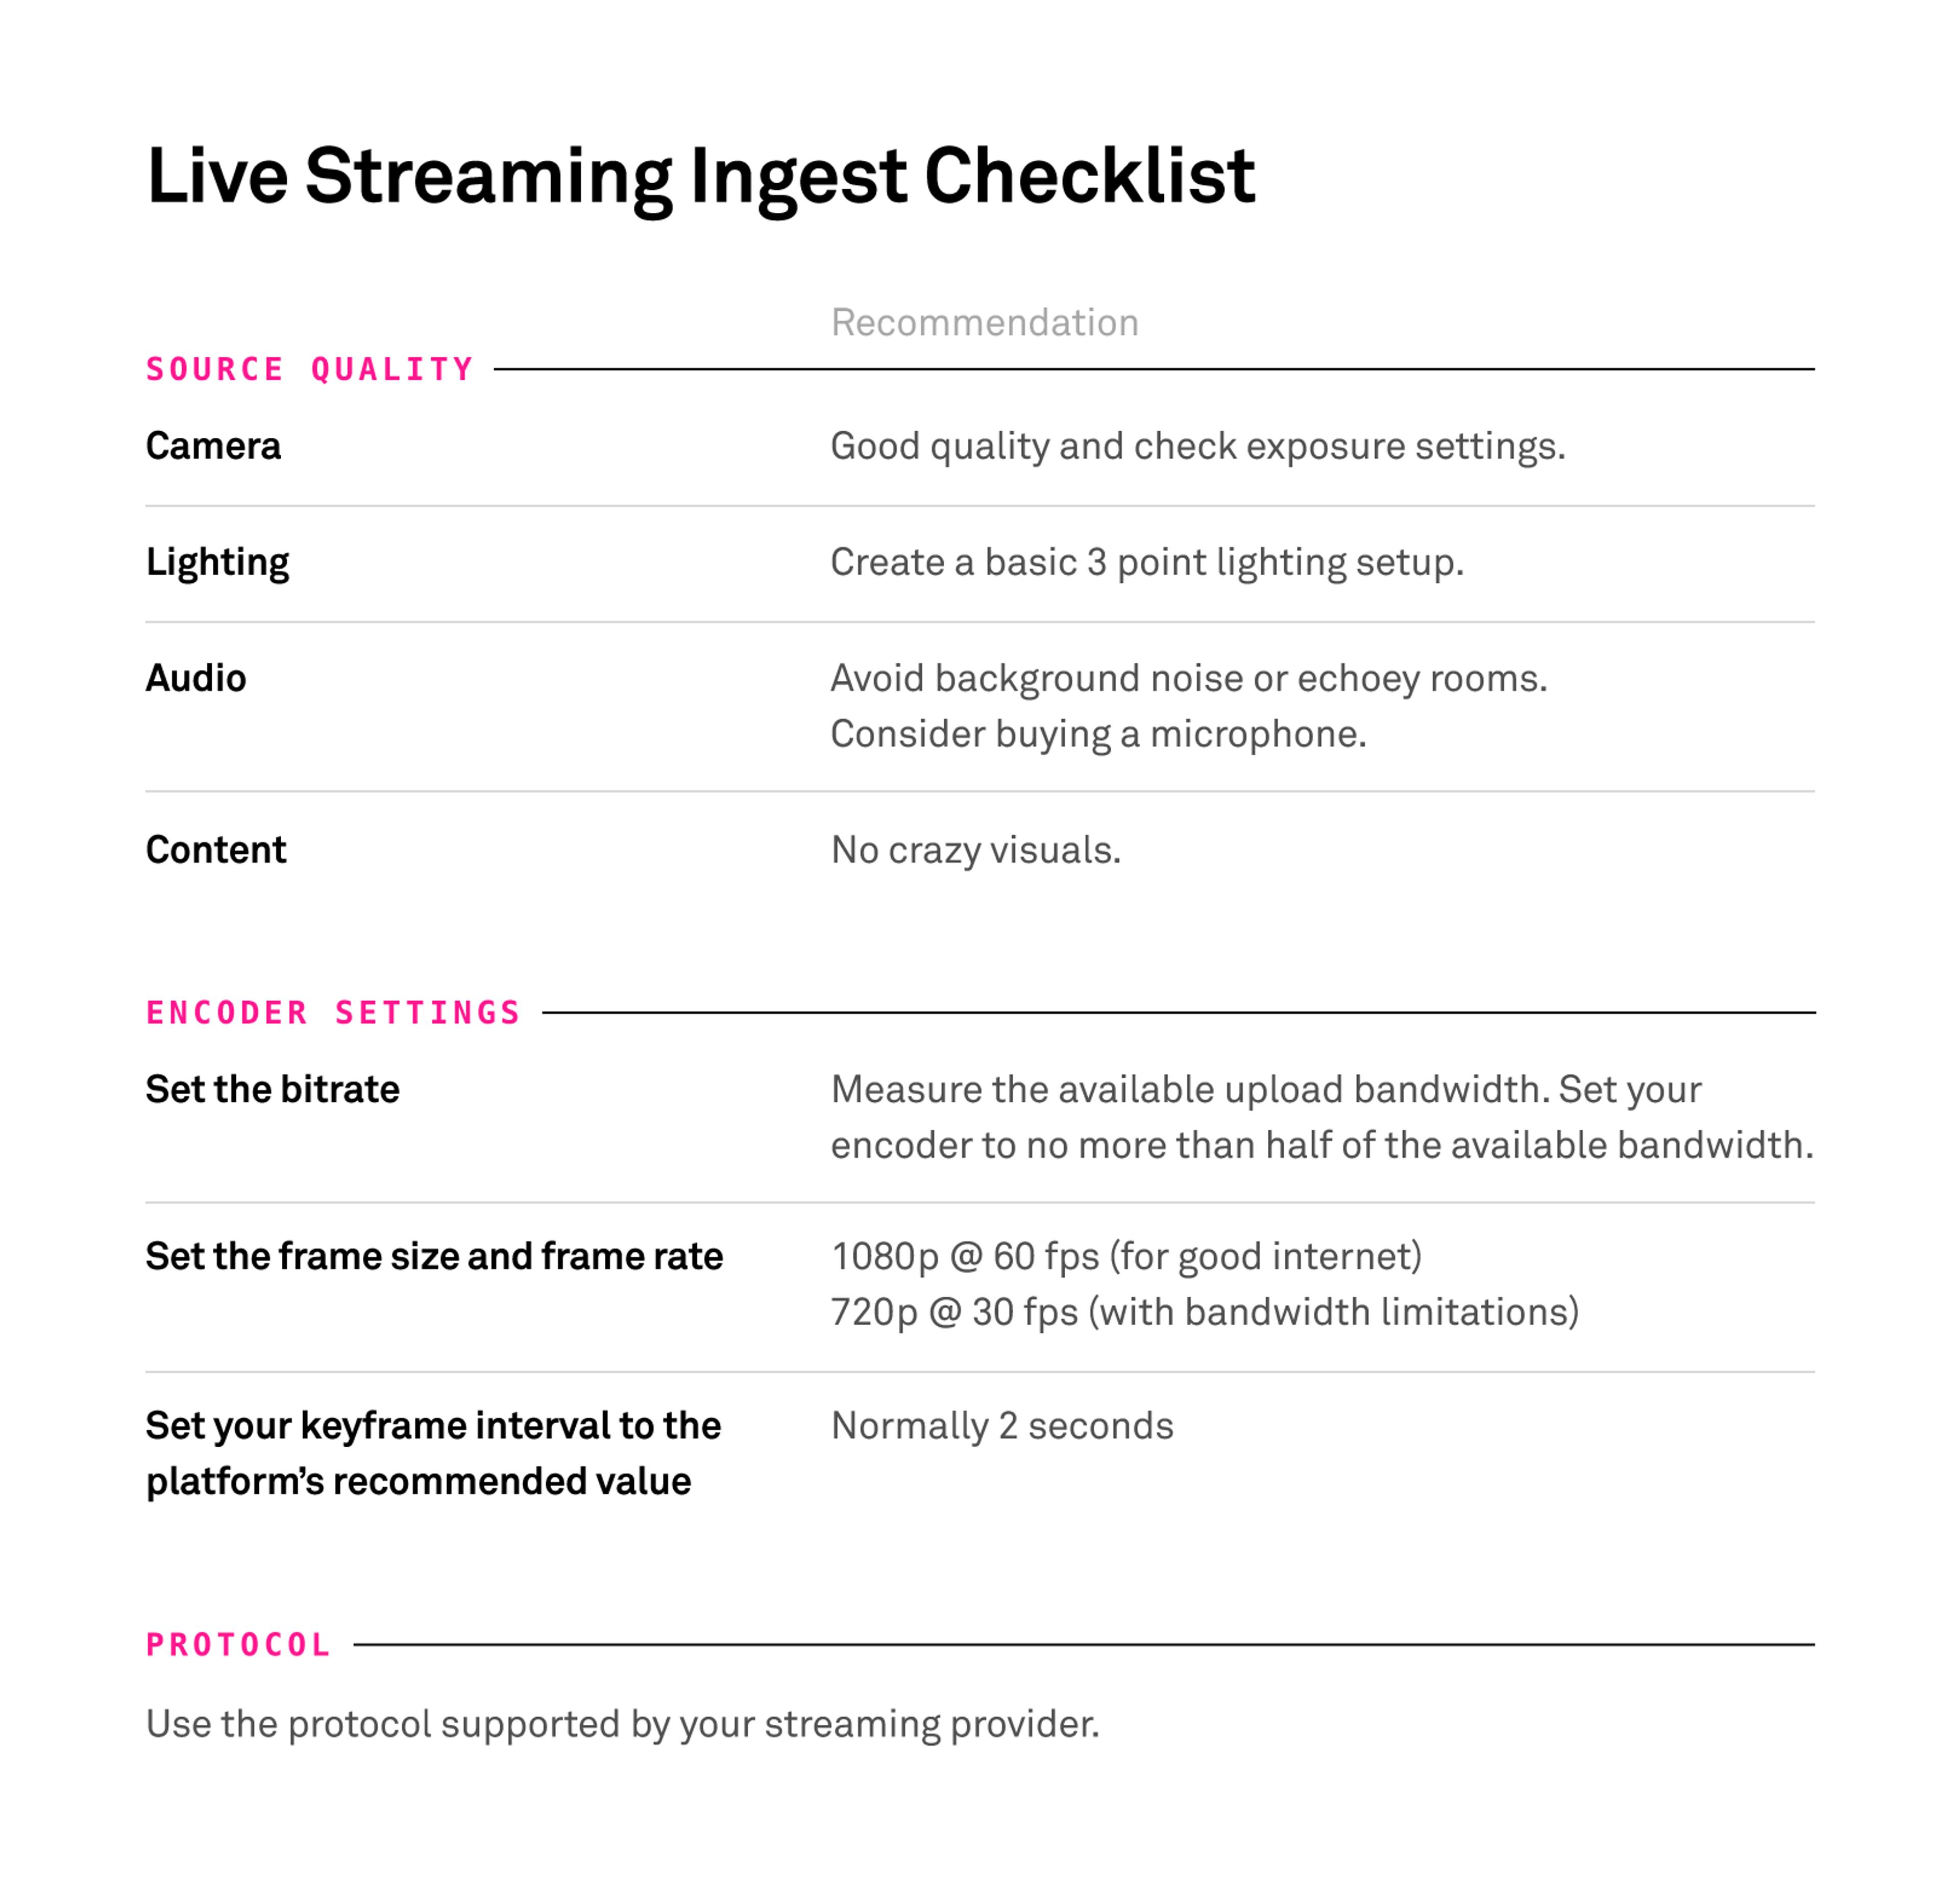
1. Source quality
It probably goes without saying, but having a good quality input will instantly help the quality of your live stream for your viewers. To coin the commonly used phrase in the industry “garbage in, garbage out” it really couldn’t be more true for video! It’s extremely hard for video encoders to ‘make up’ missing information within a frame, so while most will do their best to smooth it out - it’s always best if you have a great quality source to get the best looking output.
You can achieve this by considering three key elements: the camera, lighting, and audio. You should use a good quality camera. It doesn’t need to be a specialist piece of kit - the latest iPhones have very good cameras built in for example. Couple a good camera with a good lighting setup and you’ll be looking great. Here’s a useful YouTube tutorial for how to create a basic 3 point lighting setup. You can also alter your camera settings to find a good exposure setting and make sure the colours look OK. Finally, don’t forget the sound! Try to avoid going live in an area with lots of background noise, or in a room that’s really echoey. Buying a good quality lapel microphone to mic yourself up should help capture just your voice and reduce the noise coming from other areas. Check your levels to make sure they’re not too high or low, and that they’re coming out on the stream OK too.
Lastly, don’t do anything too crazy in your content like set off a confetti cannon or play in this extremely hard to encode video clip. It will stress out your encoder and cause a visual loss of quality.
2. Encoder settings
Getting your video feed into your platform of choice will require an encoder. Unfortunately, taking uncompressed video requires bitrates which are just too large to manage over public networks (for now at least) so it’s important to configure your encoder settings carefully. This ensures you throw away the least important information about the video and keep all the stuff that’s going to make it look great.
Most live streaming services will already have an ingest specification (here’s Mux’s recommended encoder settings for live streaming for example) so make sure you look at these first as they will give you the best starting point.
Next, from the location that you plan to go live from, measure your available internet upload bandwidth. You should do this at the same time of day you plan to go live, and if possible find out some details about the connectivity; is it shared? How many people are likely to be using it? Does it have a bandwidth cap? Tools like fast.com can help to give you an idea of how much bandwidth you have available (remember to click on ‘Show More Info’ to measure the upload speed!).
On my home connection, I measured as having a steady 18 Mbps of upload available, and as a general rule I’d recommend not going much above half of what your internet connection can handle when it’s maxed out. This is so you can avoid having drop outs due to network congestion and maintain a stable, reliable live ingest feed. For my home connection, I'm going to try setting my encoder bitrate to 8 Mbps (which is above the maximum recommendation of 6Mbps for using Mux) for the video, and 192 Kbps for the audio and see how it goes.
Side note: If you find that using a WiFi connection or slow DSL connection causes problems, don’t forget you could also try out using a cellular network! Cellular bonding routers can use multiple mobile network providers at the same time to give a good upload bandwidth and potentially a more reliable connection than your ISP.
Next, setting the frame size and frame rate. Naturally, most people these days want full HD or better for their videos because, well, it’s what everyone wants isn’t it?!
If you have a good internet connection, setting your feed to be 1080p @ 60 fps will look wonderful on most displays with a decent bitrate set (say around 6 Mbps). If however you only have 2 Mbps available for your bitrate due to bandwidth limitations, 1080p @ 60 fps probably isn’t the best choice as the encoder won’t have enough bits available to accurately represent the source. If you find yourself in this situation, consider dropping your encoder setting to 720p @ 30 fps. You will still get a reasonable quality picture, and you won’t be wasting precious bits trying to fill a 1920 x 1080 resolution image when instead it will be able to use more bits to get a better quality image at a lower resolution. If you still have issues, then you could decrease the frame size and bitrate further still to find something which is both stable and looks alright!
Finally, make sure you set your keyframe interval to the platform’s recommended value (normally 2 seconds). Keyframes are vital to producing a feed suitable for streaming, as these are the frames which will send the entire video frame data. This can also be referred to as the GOP structure. They’re important, as when the feed gets turned into a fragmented streaming format such as HLS or MPEG-DASH, each fragment of video needs to start with a keyframe.
Side note: GOP stands for ‘group of pictures’ and there’s 3 main types of frame which make up a GOP. I-Frames (or keyframes) are the most important, as these send the entire video frame of data. B and P frames are the other two types, and these will only send the relative differences from the I-frames.
3. Protocol
The final consideration with ingest is getting the video from the encoder to your streaming platform. There are a number of factors in how well this can work, including the round-trip time from you to the ingest endpoint, the protocol used and how well the protocol deals with network congestion.
RTMP (real-time messaging protocol) remains a common choice for most live streaming ingest technologies. It’s been around for a while now and is well supported by many encoding providers (both hardware and software based). RTMP does have some limitations however; it only supports a single H.264 video and 1 stereo audio track so say goodbye to any extra audio or ancillary data like captions! It also doesn’t work for going live from the browser, since most browsers have killed off supporting flash applications. Having said this, we still <3 RTMP, it’s a simple way to get live video around the internet which generally Just Works™.
So, how about that ‘going live from a browser’ thing you mentioned? In a nutshell, the best way to do this today is to use WebRTC. Matt did a post all about this particular challenge not long ago, which you can read here.
OK, but what if I want to get a bit more advanced with my technology? Well, there’s lots of other options out there. RTP + FEC (Realtime Transport Protocol + Forward Error Correction) can work well, providing your source isn’t too far away (geographically) from the receiving server. SRT (Secure Reliable Transport) is an emerging technology which is designed to handle video over unpredictable networks, or RIST (reliable internet streaming transport) is another option for this use case. Commercially, Zixi has developed its own proprietary protocol which enables the secure network delivery of Transport Streams via it’s Zixi Broadcaster software. This is a very active space, and we’ll be keeping watch to see how these develop over time.
Here's a recap of all our recommendations in a handy checklist:

Summary
Overall, finding the setup which works for you is an iterative process. These are all recommendations, we can’t guarantee that they’ll work perfectly but they should help. The best thing to do is test your setup and tweak settings until you find the sweet spot for what you’re broadcasting.
We can categorically say one thing however; don’t be too ambitious with your bitrate! If the connection doesn’t have the bandwidth, live video is very unforgiving if there is a dropout at the source - so always be conservative with this particular setting for maximum reliability.
Thanks for reading!


