One of the more common questions we're asked is how to implement video uploads to Mux. While it'll seem straightforward once explained, there are some considerations that should be taken into account. The purpose of this post is to help articulate these details that makes it easy to understand how to work with uploads in your implementation.
Quickly though, I should also mention that we already have integrations for a set of CMS systems—
The above are easy ways of enabling uploads with CMS systems if you're already using them or if you're in the process of evaluating a CMS for a fit with your workflow.
Frontend design
I'm going to describe this slightly differently than I usually do. Usually, I cover topic areas in logical order which would have meant that I start with the backend. However, I want to start with the result first and work backwards.
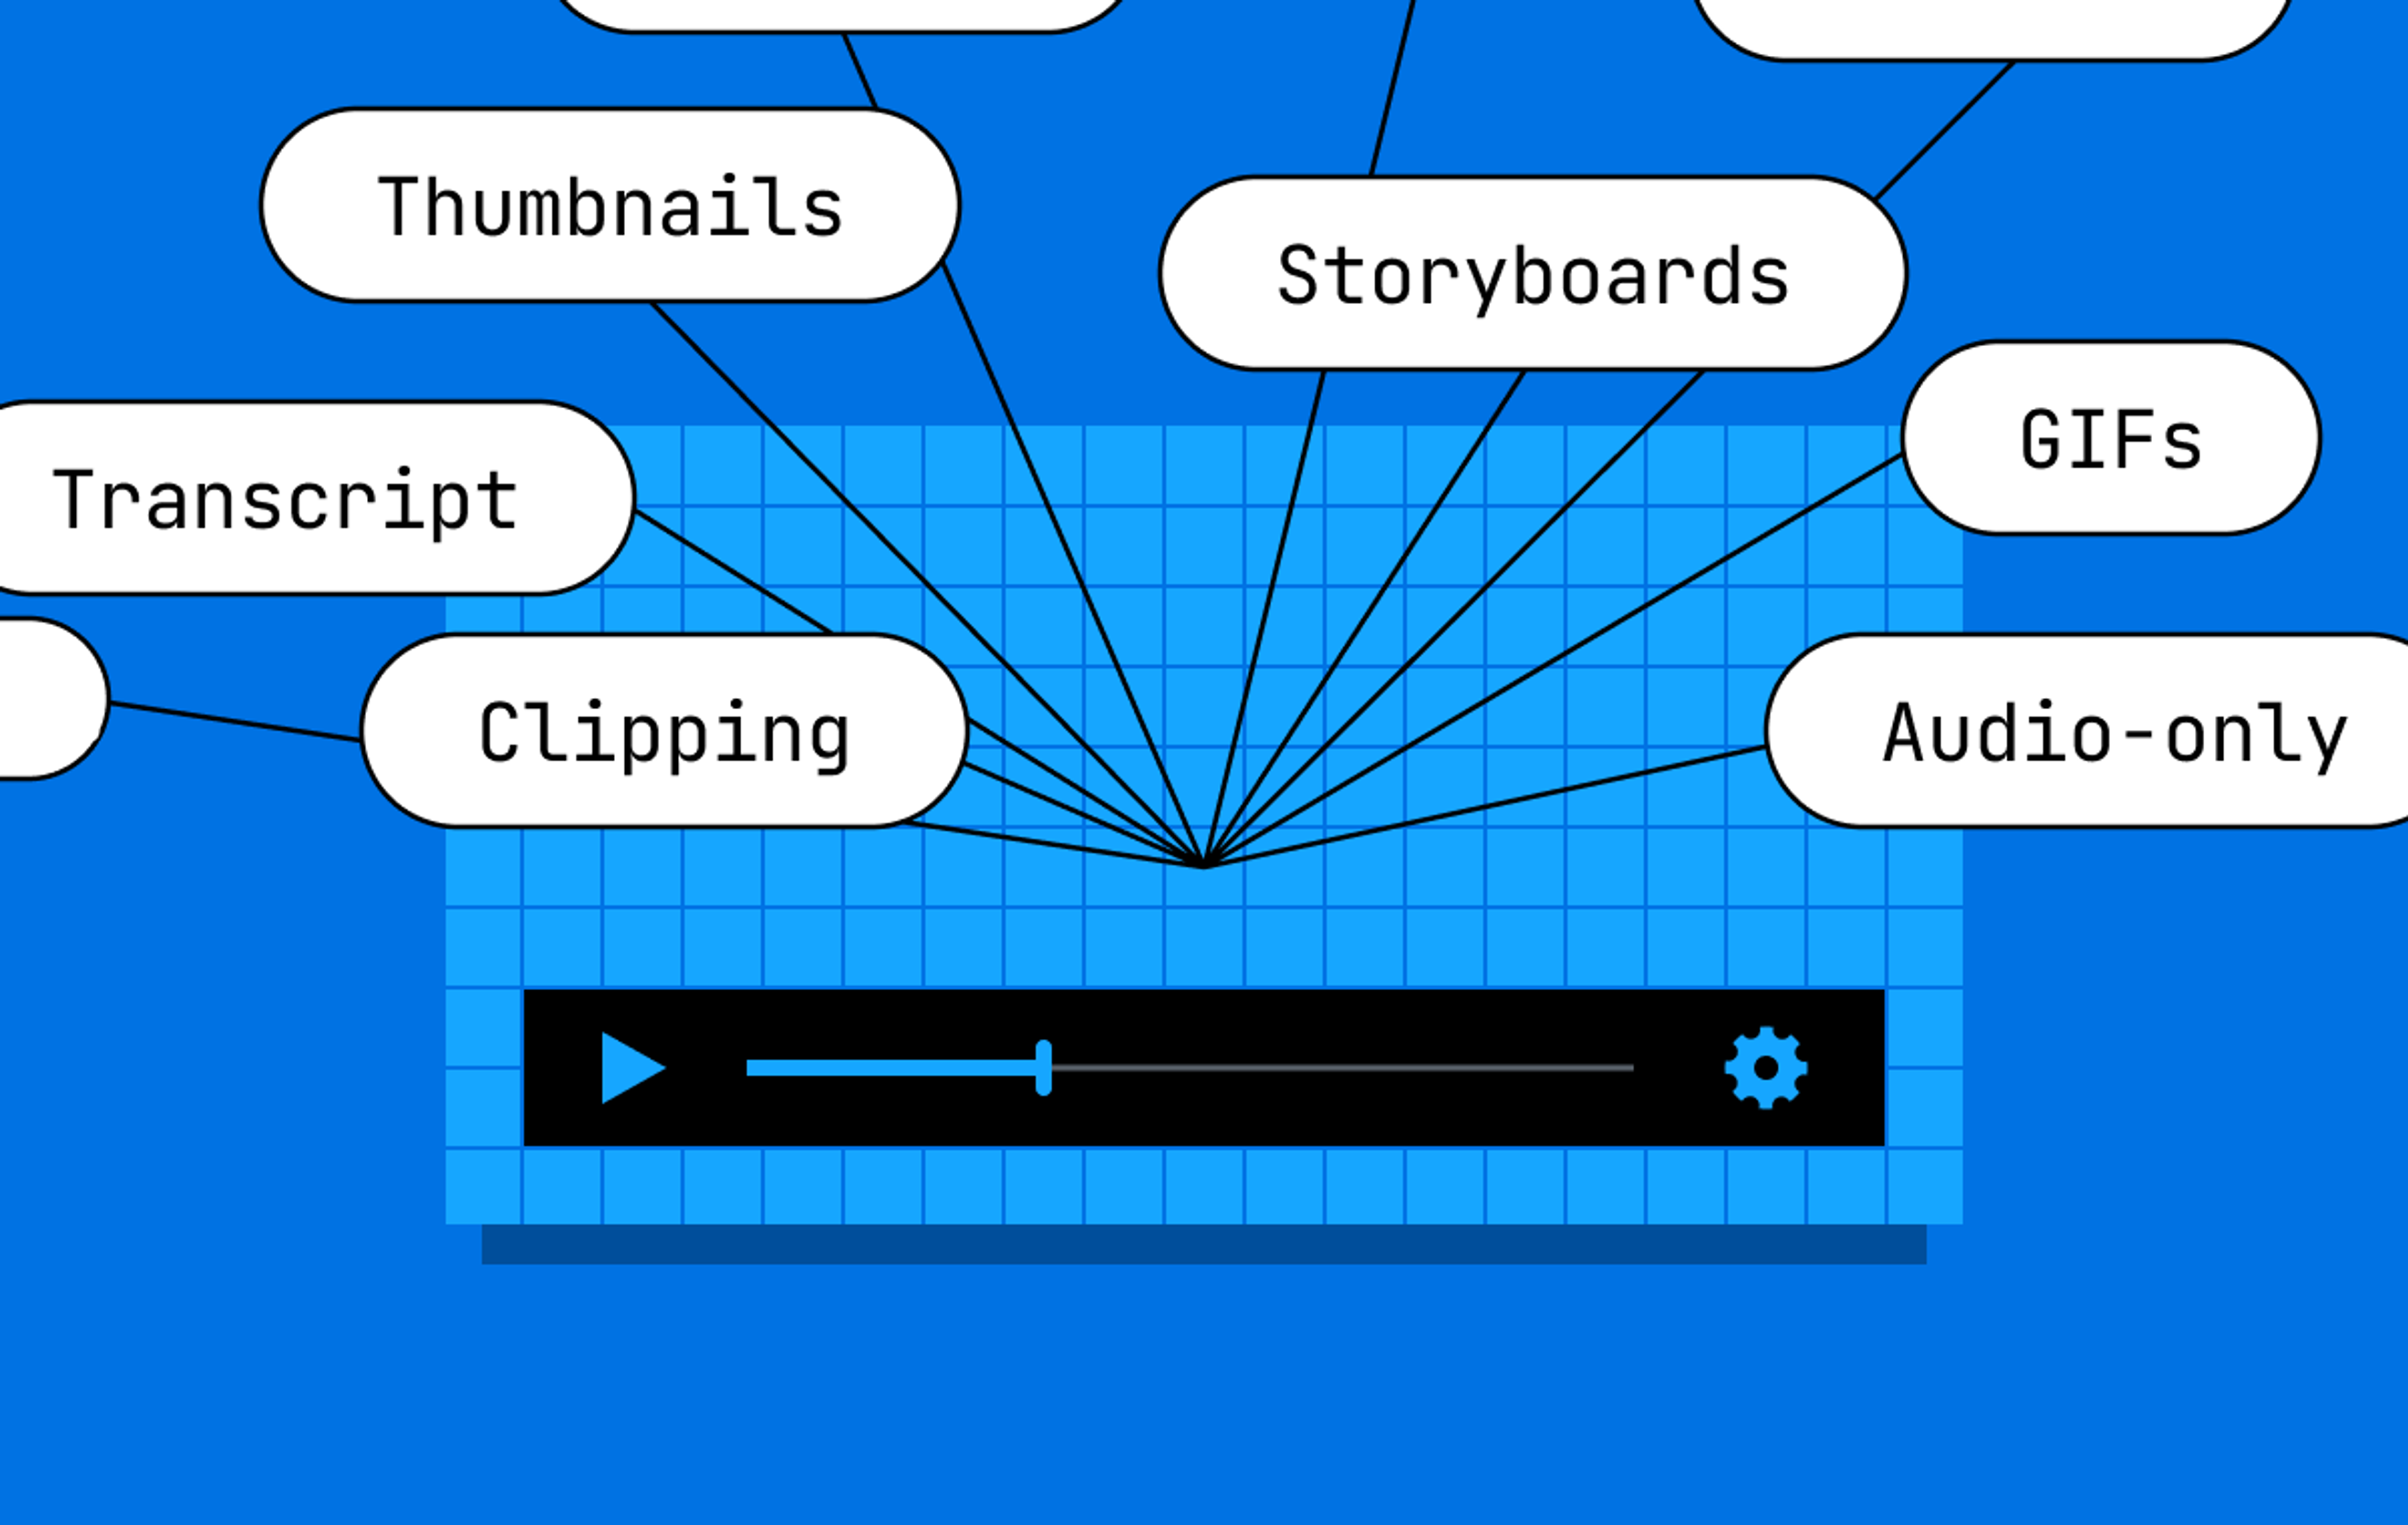
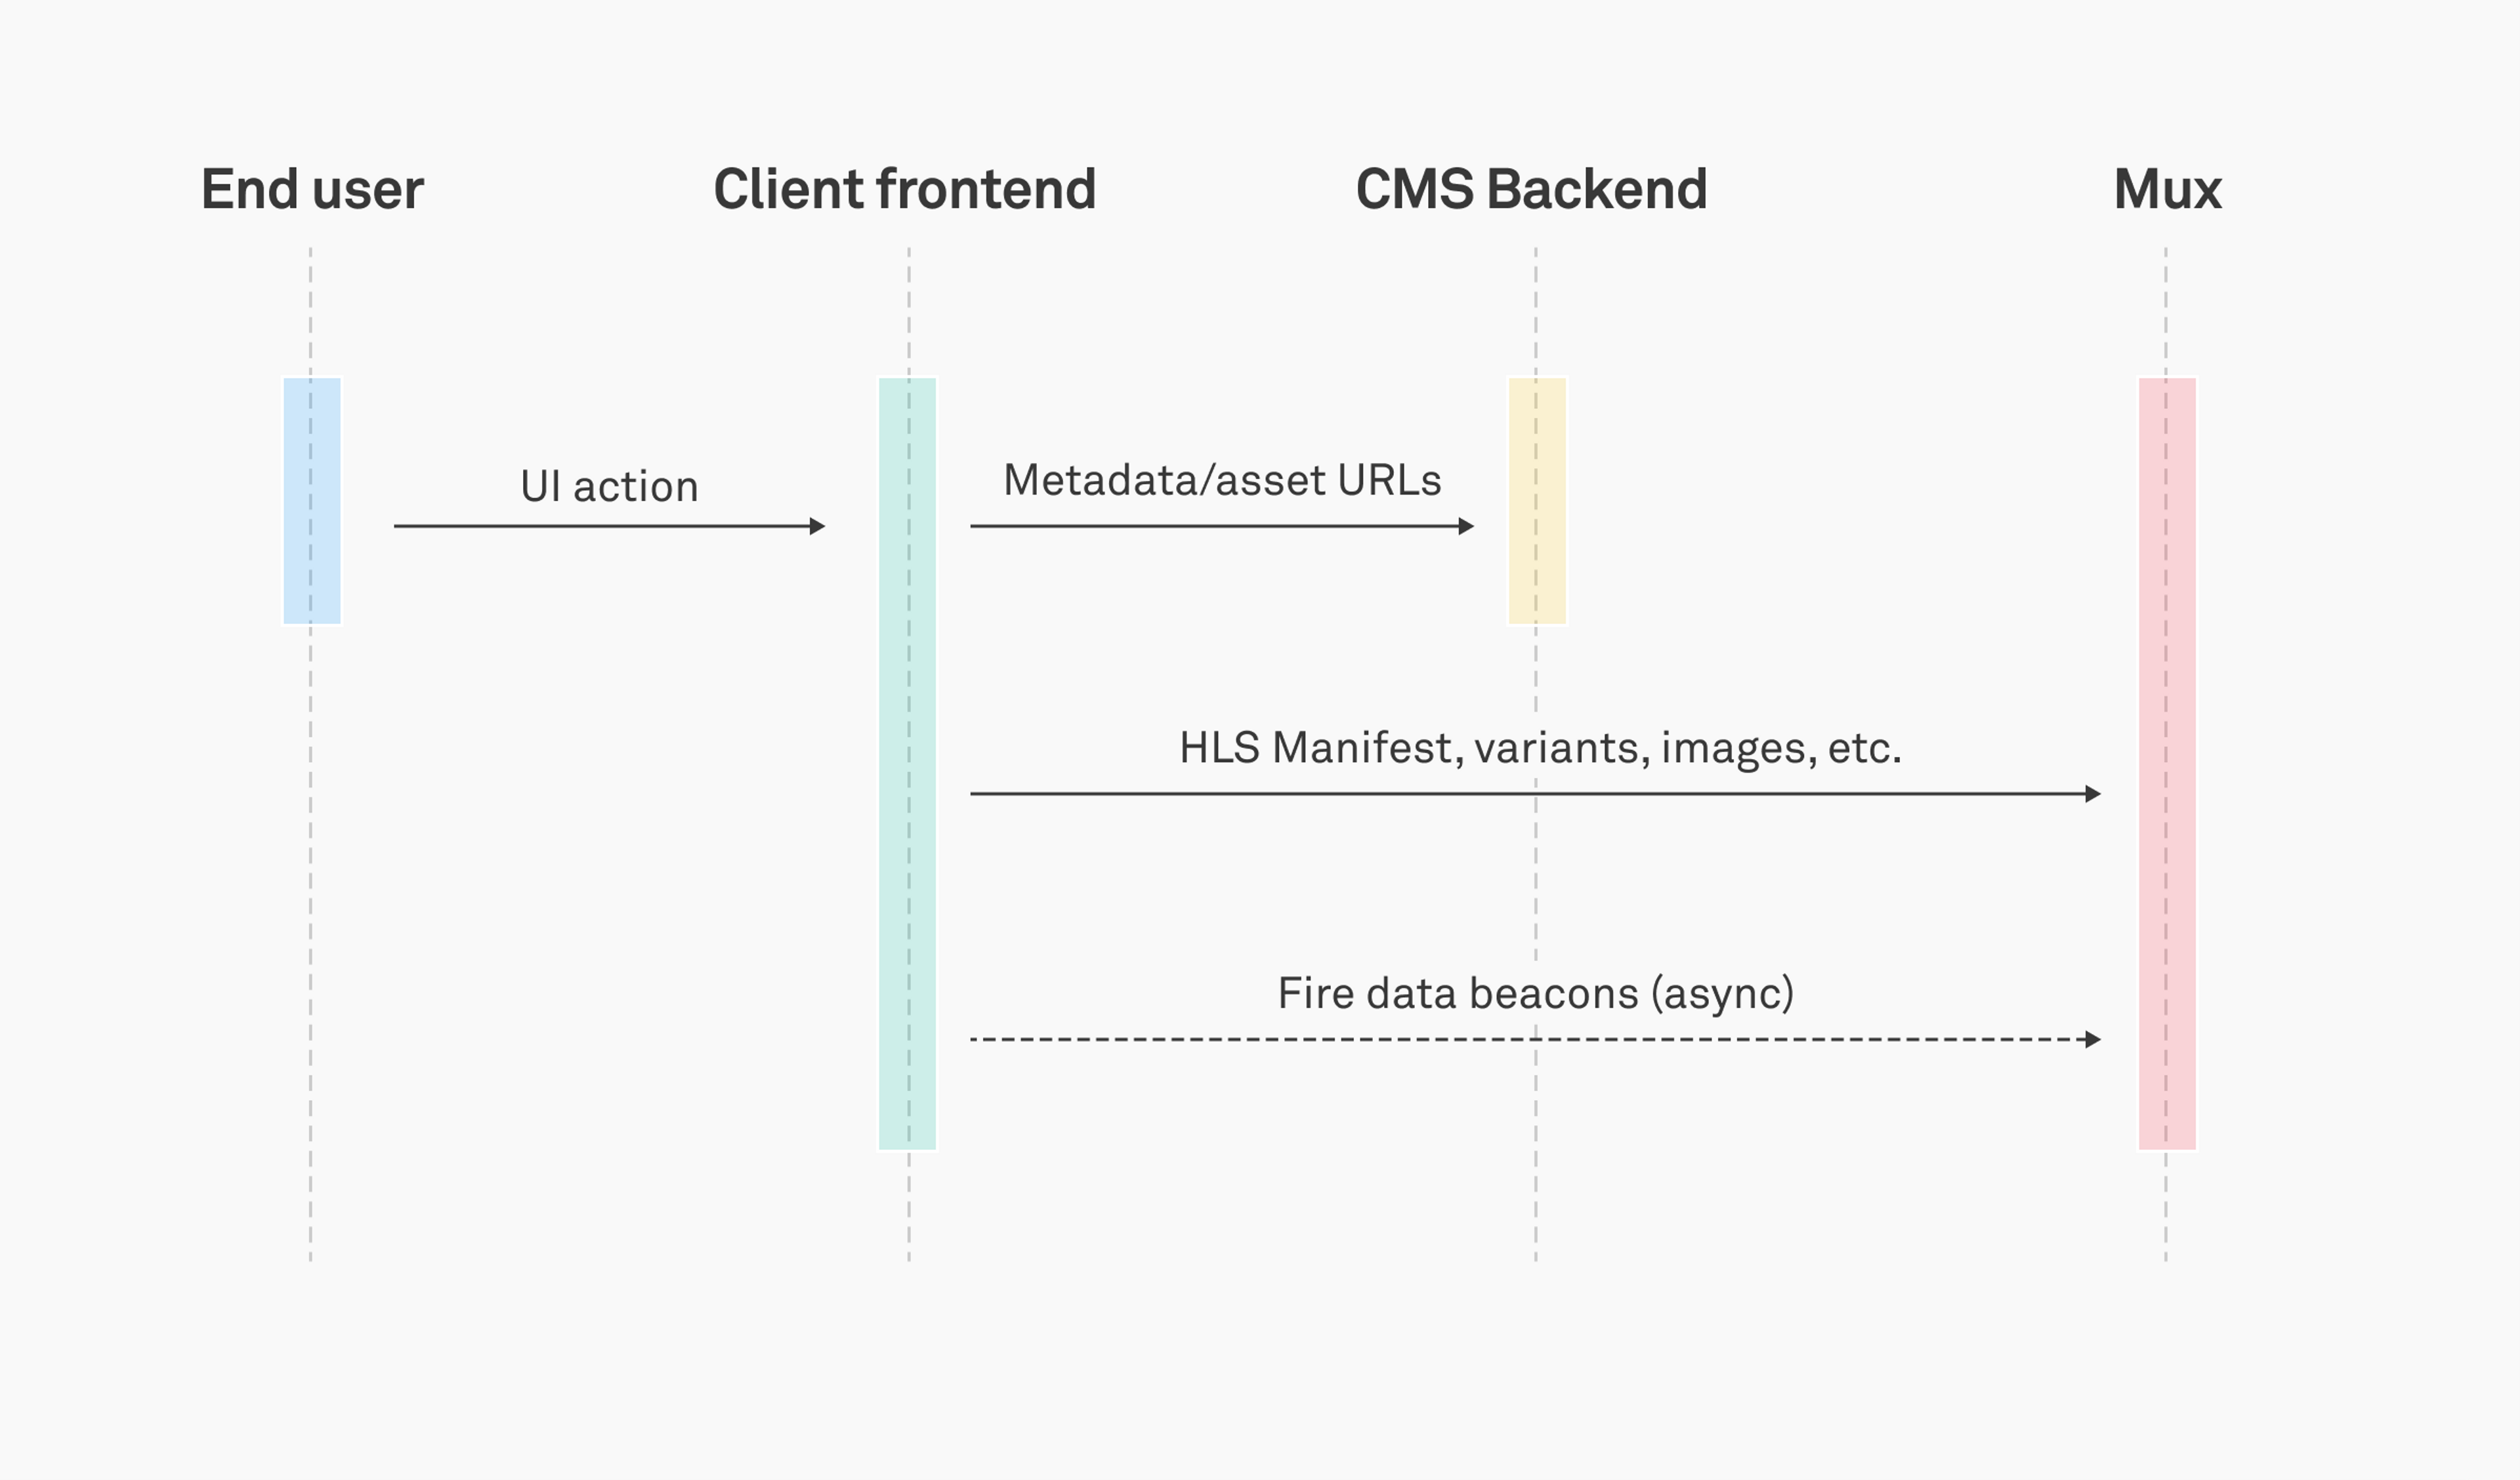
Integrating a frontend to work with content that was uploaded to Mux is extremely easy. Knowing the playback_id of the asset you want to play is enough to get you video playback as well as image assets using our public APIs.
Furthermore, you can integrate with Mux Data easily using some out of the box integrations for common video player technologies. Using these integrations makes it easy to start capturing data analytics and extend the information as needed. Using players outside of our out-of-the-box integrations is certainly possible, but is outside the scope of this post.
The below diagram shows a high-level sequence for integrating a client app with Mux for content playback. This is generally done with a CMS in between to add any metadata or business logic.
Backend design
Where the rubber really hits the road is integrating Mux into your solution for managing/delivery of videos.
This section contains the two common use cases for managing these uploads (Direct Uploads through a CMS UI or Pull-based Inputs via an external system). While these cases are very relevant, they are not meant to prescribe exactly how your specific architecture needs to work.
The key takeaway with this is that Mux allows you to build your backend systems around Mux easily.
Uploading through a CMS UI
Take a look at the following sequence diagram to understand from a high level how this will work—
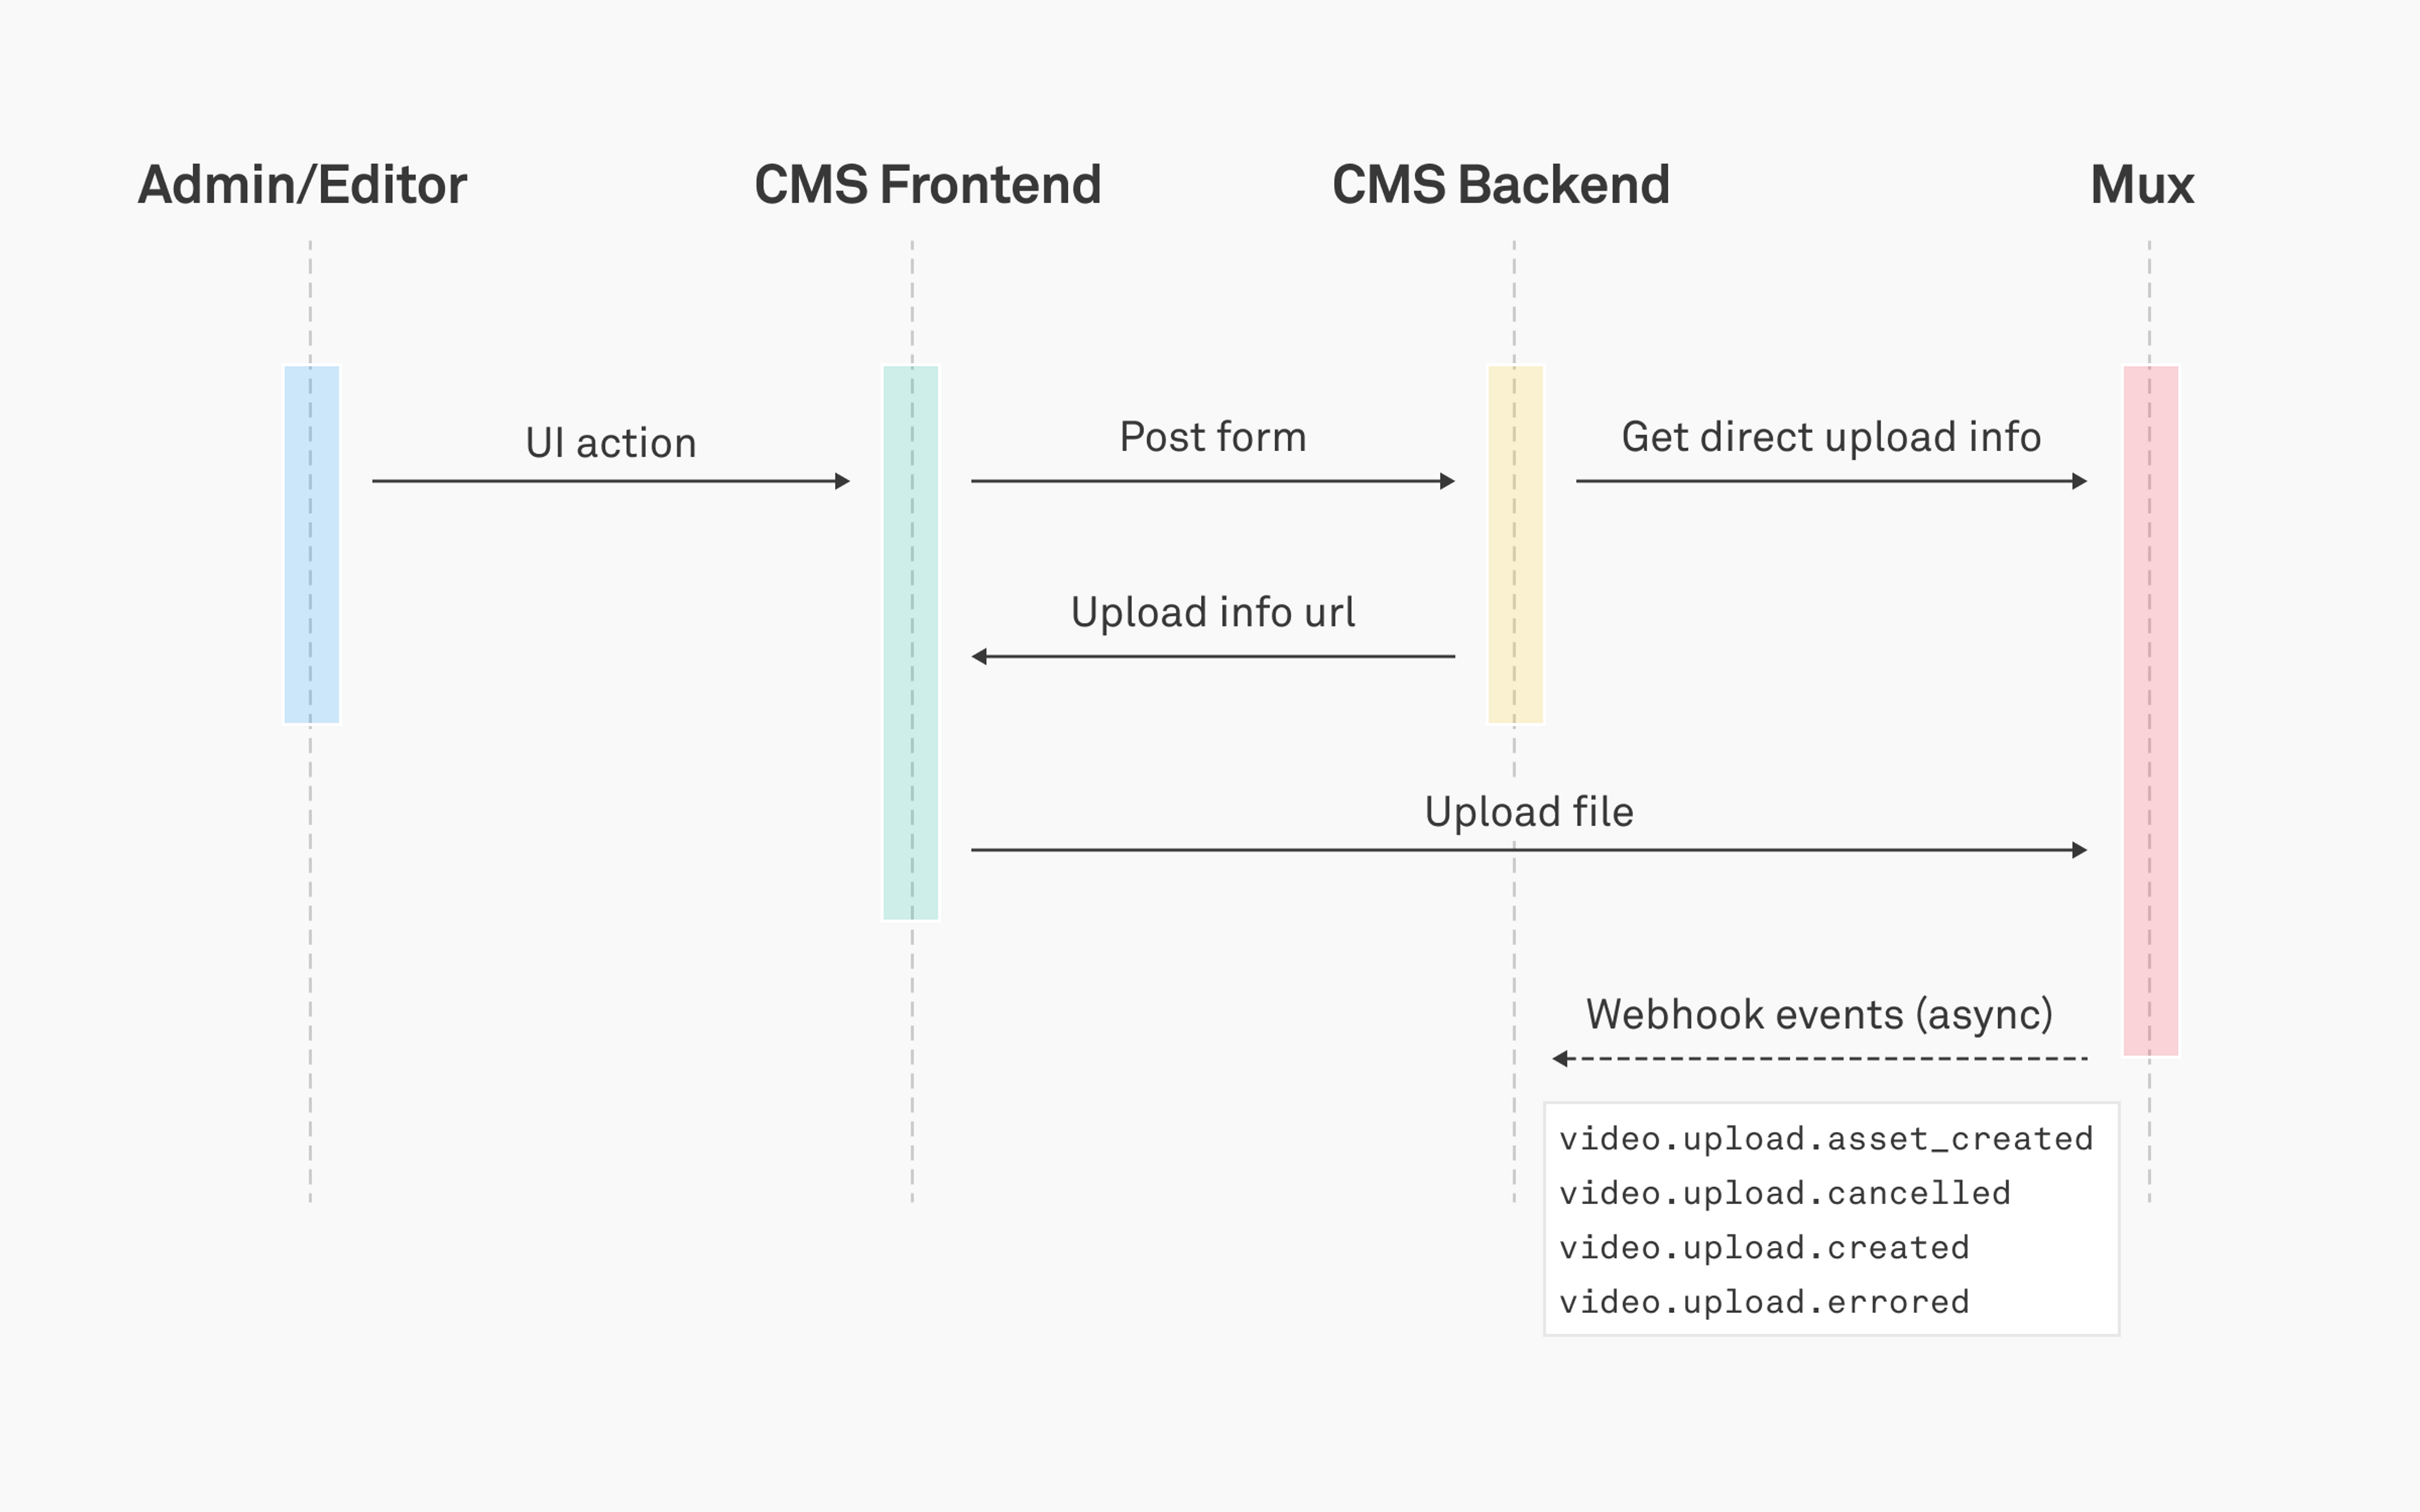
An Editor will use the UI to select the physical file that they want to upload. This UI will generally be customized to contain other metadata fields that they want to associate to the content within their CMS backend. Once they are done, they will submit the form.
Let's take a moment to talk about a couple of key points for Direct Uploads—
- Performance - Instead of uploading files to the CMS and then uploading to Mux, a direct upload url can be generated so that the UI can push the file directly to Mux.
- Security - To restrict unauthorized uploads to your Mux account, a one-time upload url is generated from the CMS backend using your API key/secret.
The file is not yet uploaded at this point. Instead, only metadata regarding the content is sent to the CMS backend. The backend will also be responsible for provisioning the one-time upload url from Mux—
curl https://api.mux.com/video/v1/uploads \
  -X POST \
  -H "Content-Type: application/json" \
  -u ${MUX_TOKEN_ID}:${MUX_TOKEN_SECRET} \
  -d '{ "new_asset_settings": { "playback_policy": ["public"] } }'
Be sure to replace the ${MUX_TOKEN_ID} and ${MUX_TOKEN_SECRET} with authentication details obtained from the Mux Dashboard.
The response from the above request will contain the following properties—
- data.id - The upload id used to identify the upload session
- data.timeout - Is the duration (in seconds) for how long the url can sit idle before Mux relinquishes it
- data.url - The url the client will use to push the file to Mux
{
    "data": {
        "url": "https://storage.googleapis.com/video-storage-us-east1-uploads/01aGwZtmqTYvvnxGYVDplPF9FYI5ilJQzSsjEQ00IjeSk?Expires=1603744063&GoogleAccessId=mux-direct-upload%40mux-cloud.iam.gserviceaccount.com&Signature=LgB4uBj1wW04VTmmPJJjnLLRx%2Fj2fJe%2Bs4gWCVNzM0lkjmIdiyauVpcl0zK8EUCHT2aFJvxmMVeJcSKUxEeAp54udA5%2B1VRFilbfThTRk31sofY0nhPx15ylQ2%2BxWqPxPyc%2FFxSeIuDDCe4CSuP5ONDaDjapzKK6bxAAwHSgAFjot9vVv1TH8wr5VeJjPnGwkSAb3XVYKD2IQm4ZcCWmQP%2Bzw5UHcrVG%2FXu7FKlFsipArCNr%2F6VQTFnbCZutRnUhU3xmscX558dw1IWDc%2FOnv1WjLtNuGYASxeQf631OIE3hXZeIyKSP4ynum1kX7nbx14tEoFv%2Bs5FpYGrEMWcgsA%3D%3D&upload_id=ABg5-UxPWks_4KvTGb7pi3YBOLPGAf1JtgLVCGqZjZC8660F3izXCfumNk3_o34vR5ZoUgvmr4Eb-WNHWzwc6H-9XmPxCEZ7dQ",
        "timeout": 3600,
        "status": "waiting",
        "new_asset_settings": {
            "playback_policies": [
                "public"
            ]
        },
        "id": "01aGwZtmqTYvvnxGYVDplPFaFYI5ilJQzSsjEQ00IjeSk"
    }
}
We are now ready to start upload. However, before you run off and develop your own upload manager, I would urge you to take a look at Upchunk (another Mux library 😉). This library makes it easy to start and manage uploads to Mux by offering APIs to handle the heavy lifting.
In either case, the response you'll get from the above request will include the one-time url that you can use to upload your video to.
At this stage, uploads occur directly from the UI frontend. Updates to completion of upload as well as readiness of the file will sent asynchronously via Webhooks.
Uploading using Pull-based Inputs
Another common pattern is to automate uploads. Here's a high level sequence diagram of a generic scenario that exhibits this use case—
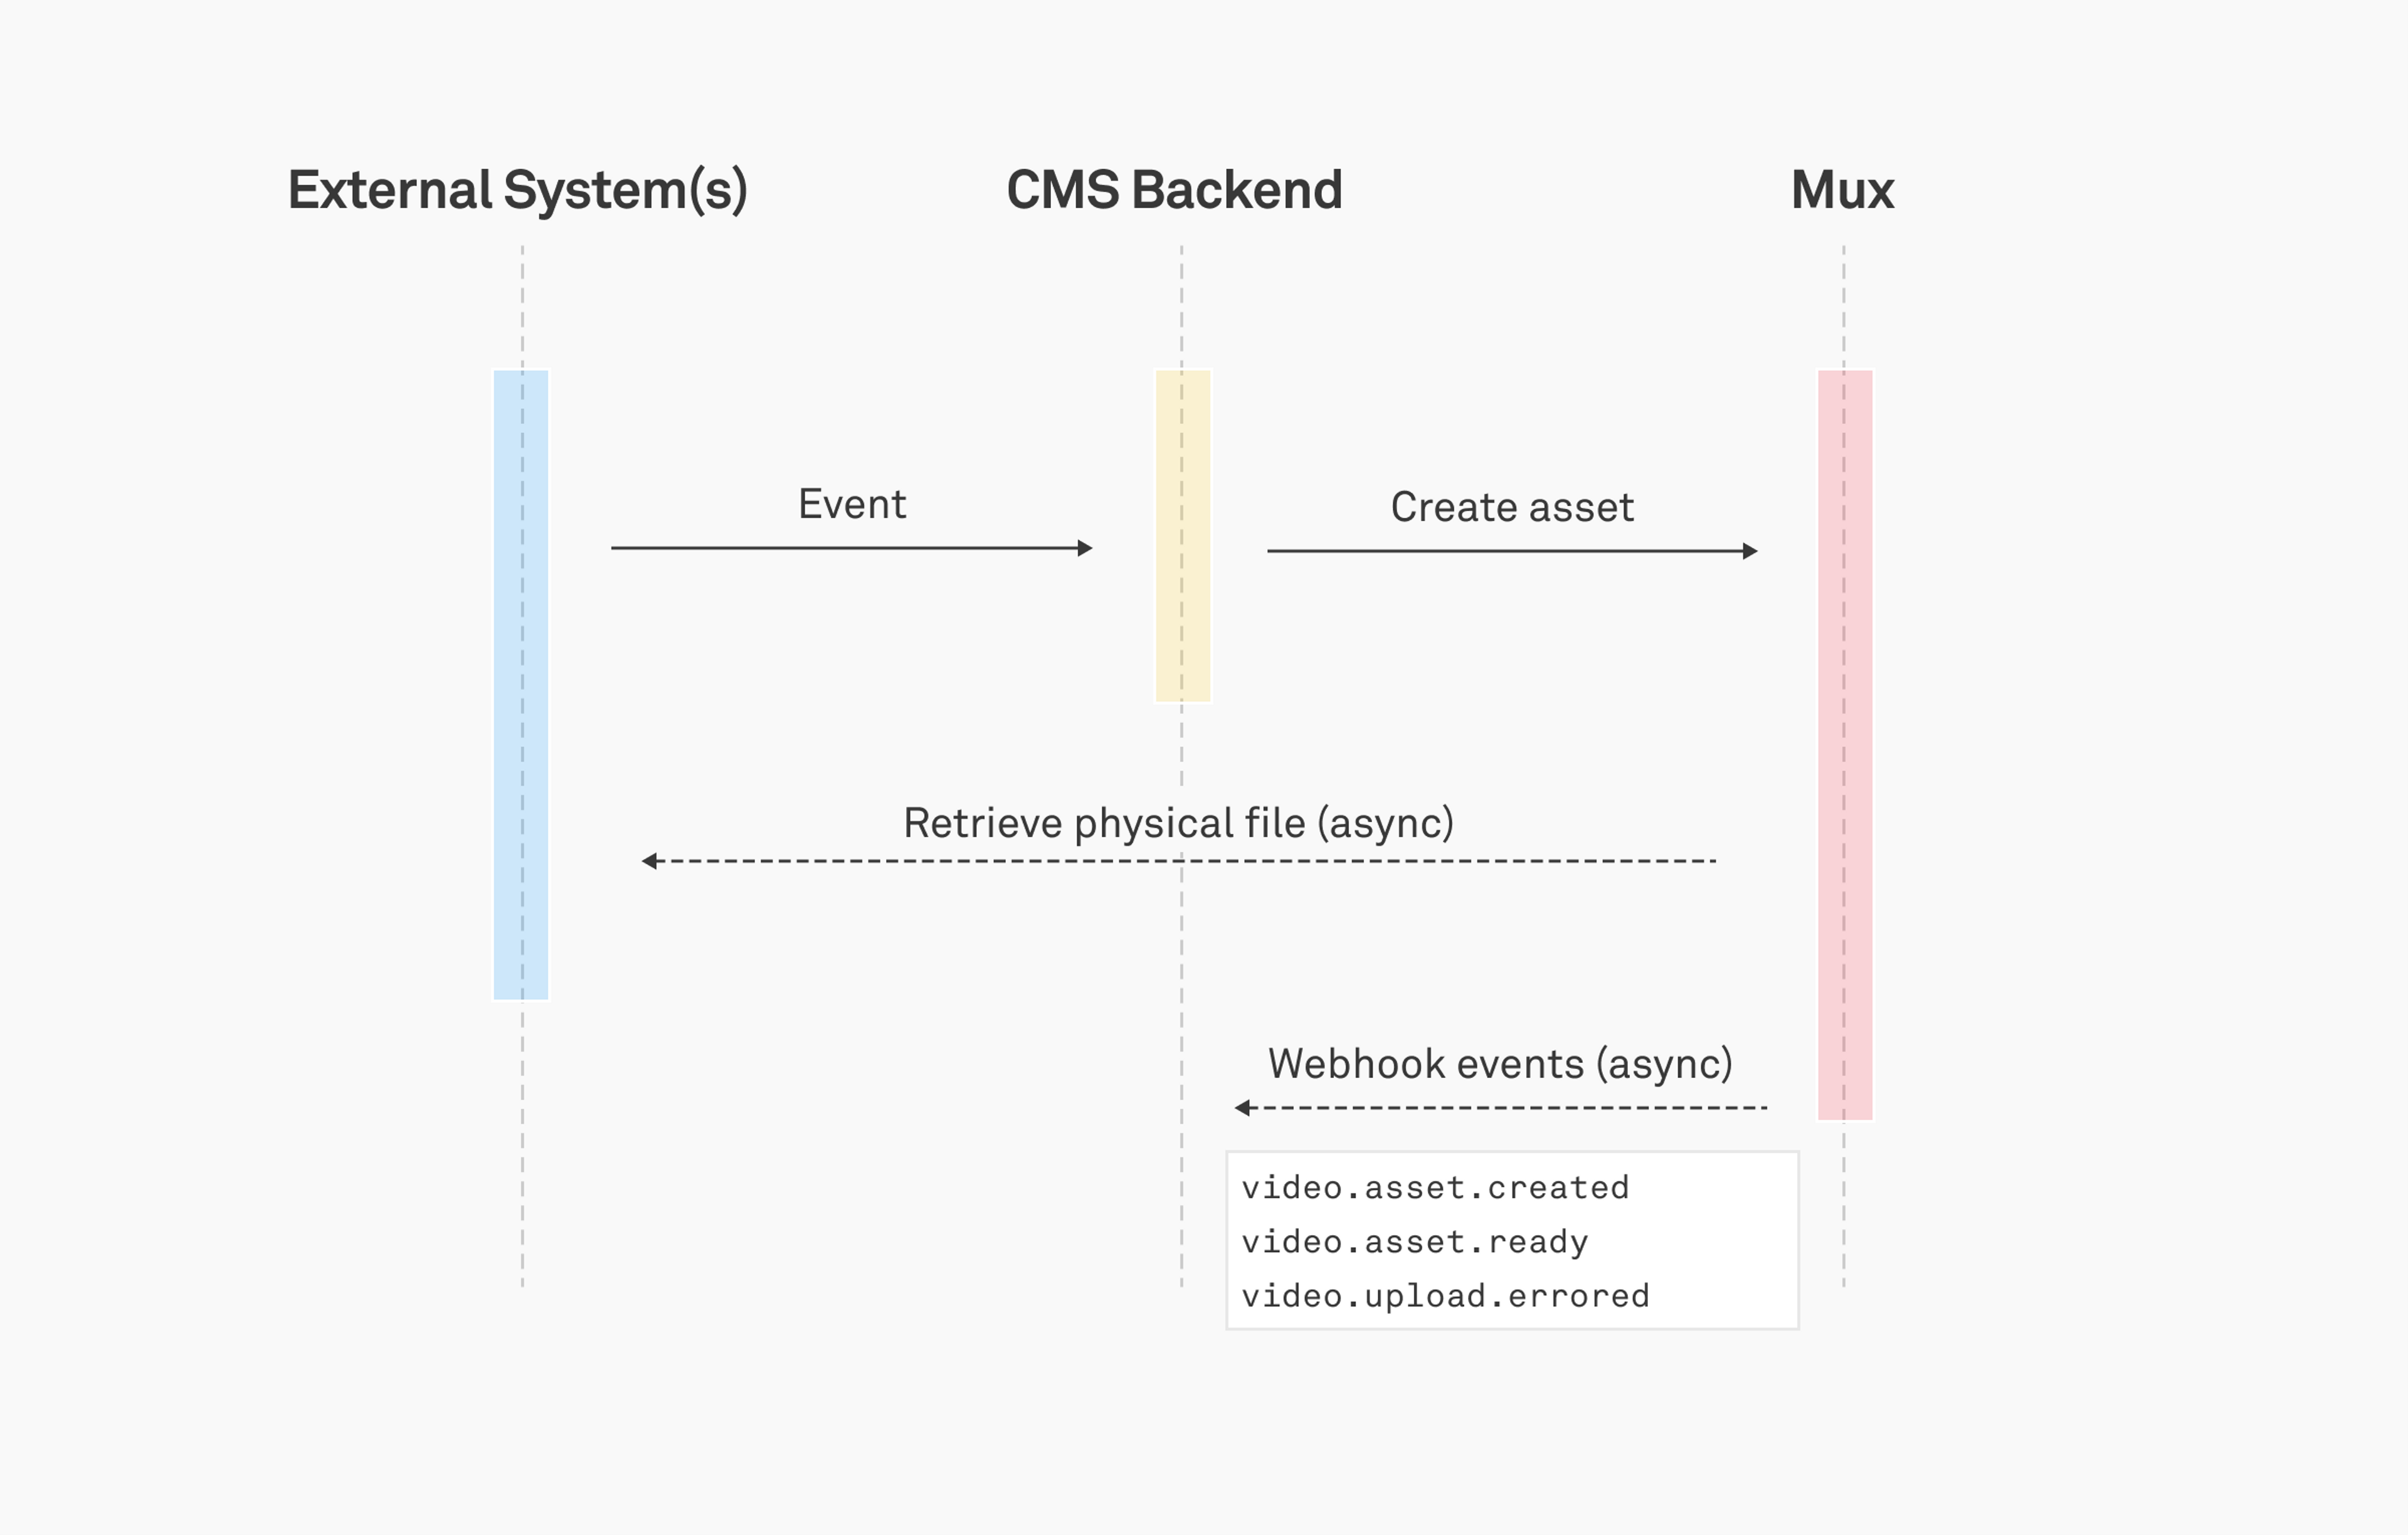
This generally would be implemented in use case where content comes from another External System(s) along with any other assets and metadata. In this case, manual intervention is not really needed and the content can be uploaded by the CMS.
The term "External System(s)" in this section is meant to be generic. Often times, our customers will have an upstream service that is responsible for handling some aspect of their video workflow. In this case, it is likely that that these services will serve as a trigger for an upload to happen with Mux where the video source is defined as the input.
Examples of an External System are (but not limited to) a DAMS (Digital Asset Management System), a third party video API, or something as simple as a Dropfolder.
If the content is publicly available through SFTP, HTTP, or HTTPS, then this url can be passed along to Mux using the Create Asset API. Here's an example API request/response—
$ curl https://api.mux.com/video/v1/assets \
  -H "Content-Type: application/json" \
  -X POST \
  -d '{ "input": "https://example.com/myVideo.mp4", "playback_policy": ["public"] }' \
  -u ${MUX_TOKEN_ID}:${MUX_TOKEN_SECRET}
Be sure to replace the ${MUX_TOKEN_ID} and ${MUX_TOKEN_SECRET} with authentication details obtained from the Mux Dashboard.
After executing the above, the response you can expect receive would look similar to the following—
{
    "data": {
        "status": "preparing",
        "playback_ids": [
            {
                "policy": "public",
                "id": "gt4TnEiLsanEscuH4LSlYI9vQVD3H2O3YwOynhLOHW4"
            }
        ],
        "mp4_support": "none",
        "master_access": "none",
        "id": "gL7nSCSO2b2DLVbrKkRShPaCAf8WvlbYZ00zUiopg4Ao",
        "created_at": "1603396036"
    }
}
While you will receive a response after sending the API request, the actual retrieval and processing of the video happens asynchronously (a little more on this in the Webhooks section). The response contains information that can be persisted with your CMS system. Notably, the playback_id is what is used in the playback delivery and image generation with Mux's APIs.
The id property of the response correlates to the Asset's id and can be important if you want your CMS system to also be responsible for managing the removal through the Delete Asset API request.
In the spirit of automated goodness, updates to the video uploads completion as well as the readiness for consumption will be sent by Mux via Webhooks.
Webhooks
To close the loop on uploads, an integration should utilize the Webhooks functionality of Mux. Specific events will be triggered by Webhooks that let any consuming service know the progress of an uploaded asset.
File processing and transfer to the CDN happens asynchronously as the duration of this phase is undetermined. To avoid blocking API calls, we opted to use Webhooks as our method for notifying key events as they occur. Examples of events would be "Asset is created", "Asset is ready", etc.
Instead of listing out each type of event, take a look at the following Webhook Payload Explorer. You can see the two methods of uploads (Pull-based Inputs and Direct Uploads) along with the payloads that you can expect to get in numbered order. This will help in understanding the data that can be expected during the upload lifecycle.
Webhooks are sent along with signatures so that your receiver is able to validate that the event payload did indeed come from Mux. You can read more about this on our Webhook Security documentation.
To consume Webhooks, you can certainly do this manually if you have the know how for comparing crypto signatures. Again though, we have something for that. We have a libraries called mux-node and mux-elixir (depending on your backend technology choice) that has built in helpers for verifying signatures.
Hopefully this post helps demystify the options you have when selecting a method for uploading your videos to Mux and brings you a step closer to Mux greatness 🤩
Giraffe Icon made by monkik from www.flaticon.com